
Combining Layer Styles In Photoshop
Tutorial created using Photoshop CC with Windows 7
Layer Styles are one of my favorite tools in Photoshop, and I use at least one on every scrapbook page I create. This tutorial will show how you can apply more than one layer style to a single layer!
Normally, applying a preset style replaces the current layer style. However, you can add the attributes of a second style to those of the current style.Simply hold down the Shift key as you apply the second style, and it will add the style to any existing effects on the destination layer.
How well this works really depends on which styles you have in your stash and how each style is created. If the style uses a pattern overlay as its primary option, using another style with a pattern overlay will override the first one. There is a way around this. Just duplicate the layer and apply the second style to the top layer!
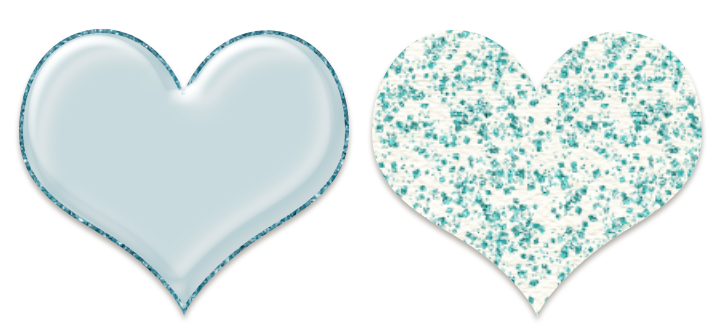
For the heart on the left in the example below, I applied a style from ScrapSimple Tools – Styles: Bubbles and Glass 6301 to the heart.ThenI applied a style from ScrapSimple Tools – Styles: Glitter Edge 6301 Biggie to the same layer. By holding down the Shift key while adding each style, I was able to combine them.For the heart on the right, I wanted to combine two styles that use pattern overlays. In order to do this, I duplicated the heart layer applied a paper style from ScrapSimple Tools – Styles: Art Textures on the bottom layer and used ScrapSimple Tools – Styles: Loose Glitter 6401 Super Biggie on the top layer.
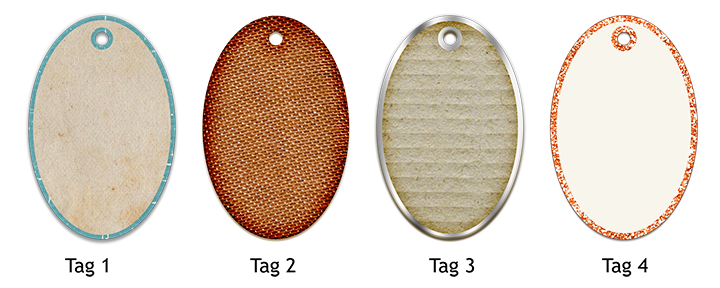
The examples below were all created by combining two styles while holding down the shift key. You may find that order the styles are applied makes a big difference in the results you achieve.
Tag 1 -Apply ScrapSimple Tools – Styles: Jubilant 6401 Super Biggie first, then apply ScrapSimple Tools – Styles: Life Papers 6401. When applied in the opposite order, it doesn’t work because the pattern overlay in the second style overrides the first one.
Tag 2 – Apply ScrapSimple Tools – Styles: Burned Textures 6301 and then apply ScrapSimple Tools – Styles: Burlap 6301.
Tag 3 – Apply ScrapSimple Tools – Styles: Soldered Glass 6401 and then apply ScrapSimple Tools – Styles: Burned Textures 6301. It gives the look of a cardboard tag with a metal edge.
Tag 4 – Apply a vellum style like ScrapSimple Tools – Styles: Neutral Vellum 6401 Biggieand then apply ScrapSimple Tools – Styles: Glitter Edge 6302 Biggie.
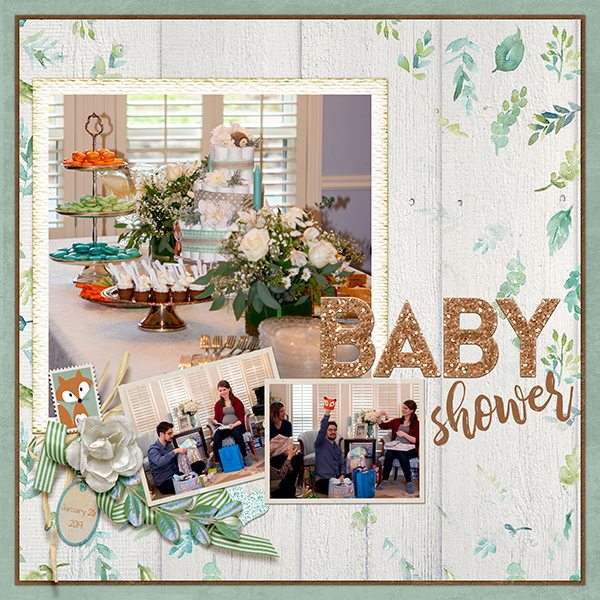
For the word art in my layout, I used the beveled version of a style from ScrapSimple Tools – Styles: Life Papers 6401 and then applied one of the ScrapSimple Tools – Styles: Wild and Woodsy glitter styles. I also used the ScrapSimple Tools – Styles: Art Textures combined with the ScrapSimple Tools – Styles: Burned Textures 6301 for the mat behind the large photo.
When you start combining styles, it’s like getting a whole new toolbox filled with fun, new styles. Try using combining some styles in one of your next layouts. We’d love to see your results in the ScrapGirls Gallery!
![]()
 Tutorial written by April Martell


Wow, I didn’t know this. I can’t wait to try the technique. I’m a styles “junkie” and now I have even more reason to add to my stash.
Thanks, April.
~Leslie Ann