
When I need to create a layout in record time, I love using clusters to speed up the scrapping process. We’re talking about those lovely embellishment clusters that our Scrap Girls designers put together for us. You can find them in some collections or in coordinating embellishment sets. In this tutorial, I’ll show a few ways you can use ready-made clusters to create quick layouts.
Tip: One thing to be aware of when you’re using ready-made clusters is that some have drop shadows and some don’t. Most designers will include both versions (shadows and no shadows) and label them as such. If you’re using clusters with a drop shadow, you probably don’t want to add a second shadow to them.
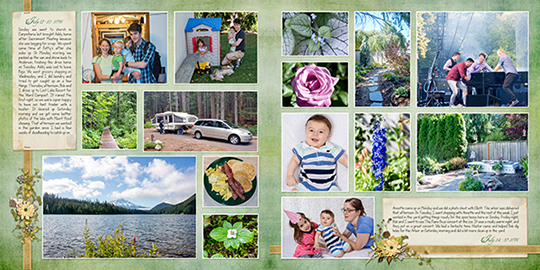
You’ll find loads of clusters on my Project Life pages. I’m usually way behind on them and then end up trying to complete most of the year in a few weeks! For this spread from July 2016, each page uses a single cluster from Simplify Cluster Embellishment Mini. The coordinating clusters made the two pages work well together. They also made the whole spread come together in just a few minutes!
Some collections have numerous cluster sets and they often come in Value Packs. I used the Value Pack: Evasion to create this layout of my mother’s uncle, Merlyn. I simply added one border cluster to the side and another to the top of the page. The hardest part of this layout was typing out the journaling!

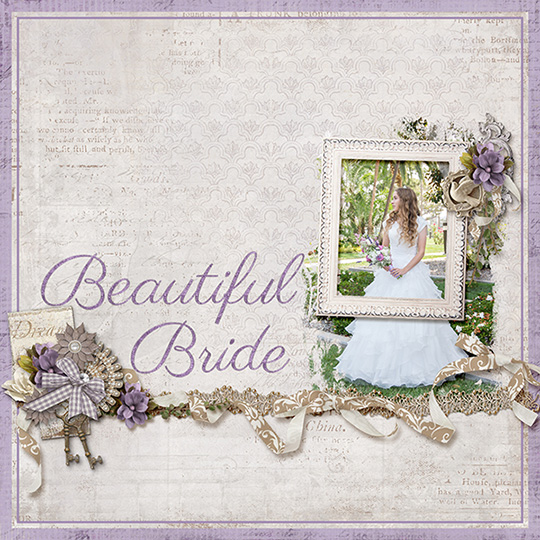
For this final layout, I used the Moments Of Bliss Mini Clusters and added other embellishments from the Moments Of Bliss Collection. Let me explain how I created this layout:
1. I added the frame over the photo and then dropped a cluster over it.
2. I created the border using the ribbons and lace.
3. I added the cluster on the left and then added a second purple flower to it.
4. The original cluster had the word “Peace” on the paper behind the flowers, but I thought the “Dream” word art from the collection worked better for a wedding layout. To change the word, I placed the new word art paper behind the cluster, then rotated and resized it to get the positioning exactly the same as the existing paper. Then, I erased the extra paper so that the word “Dream” showed instead.
Clusters are one of my favorite digital scrapbooking products because they can save so much time. Try creating some quick layouts using clusters, then post them in the Scrap Girls Gallery. We’d love to see your pages!![]()
 Tutorial written by April Martell


These are beautiful pages! I can’t wait to try!