
Stop! Don’t run away! Come back…. I know the words Gradient Tool can be a little daunting but you are going to love this technique. It’s super simple, super versatile, and most importantly, a great timesaver. Yes, really.
As digital scrapbookers, one of the ways we have an advantage over paper scrapbookers is that we can blend our photos into the page. Today, I’m going to share with you my super-quick way of blending a photo into your background with minimal fuss and maximum oomph! using the Gradient Tool in Photoshop or PSE.

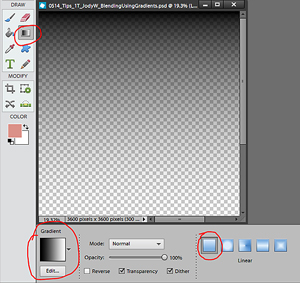
The Gradient Tool is found under the Draw category of the Tools panel. Its keyboard shortcut is G.
Click on the Gradient Tool button, and the drop-down menu will give a range of options: The key ones are highlighted in my screenshot. For this exercise, the Gradient image with the small arrow needs to be set at Foreground to Transparent (the second one in Default settings) while the blue unlabeled buttons require a Linear setting, the leftmost option. Keep Transparency and Dither selected as these give a smoother blend.
I am using a photo that I want to blend downwards from its focal point at the top of the image to a faded-out lower section. In keeping with this, I also want to position it at the top of my blank page. With the Gradient Tool selected, place the cursor where the gradient should extend from. In my screenshot, I started at the top of the blank page and (while holding down Shift) drew a line downwards to the bottom of the page. My gradient started out at 100% opacity and faded away to 0%. Vary the direction of the drag depending on the focal point of the photo.
Clip (Ctrl+G) the photo to the gradient layer and merge. In my example, I did this and then used the Blending mode “Darken” before placing it over the background paper.

With my focal point set, I added a lighting effect and some simple embellishments to complete my page.
Don’t be afraid of the Gradient Tool. Experiment a little and discover quick, easy, and (when done this way) editable gradients for seamless blending. Move the gradient around, stretch it out, or vary the opacity before merging the gradient and the photo. This is a great technique for using a photo that may be less than perfect, and by varying the Blend modes, you can achieve different effects.
I look forward to seeing the blended pages you create using this technique, so be sure to share them with us in the Scrap Girls Gallery.
 Tutorial written by Jody West


