• Facebook
  • Twitter
  • Google
ScrapGirls
  • SHOP
  • LEARN HOW
  • BLOG
  • FORUM
  • CHAT
  • CONTACT US
Select Page
Home / All Posts / Using the Dodge and Burn Tools to Add Depth and Dimension

Using the Dodge and Burn Tools to Add Depth and Dimension

Using Dodge and Burn to add depth and dimension

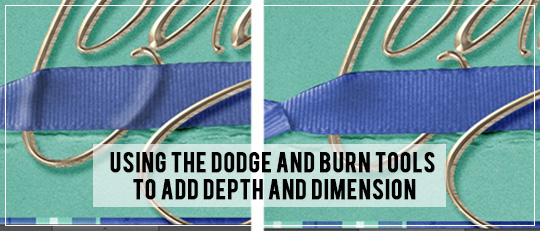
Even though I am 100% a digital scrapbooker, I love to make my pages look as realistic as possible. I am always looking for little details I can add to make things look three-dimensional. One trick I like to use is to add shadows and highlights to embellishments using the Dodge and Burn tools, making them look like there is something beneath them.

A ribbon woven through some wire word art is a great way to learn this trick. Here’s how you do it.

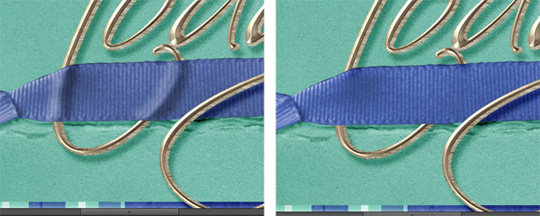
First, sandwich a piece of ribbon between two copies of the word art. Apply your drop shadow to the top copy. Erase the parts of the word art from the top copy that you want to appear behind the ribbon. Sometimes the drop shadows end abruptly and look funny when you erase parts of the top layer, so use a soft edged brush with a lowered opacity to gradually blend the top layer into the bottom beyond the edge of the ribbon.

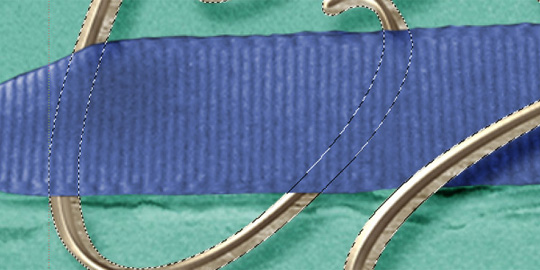
Next, make a direct selection to the bottom copy by Ctrl+clicking on its thumbnail picture. This will apply marching ants all around the word art.

06-19-14_DodgeAndBurn_AnnaM_SS1_MarchingAnts
Make the ribbon layer active by clicking on (highlighting) that layer. Use the shortcut Ctrl+J to copy the selected portions of ribbon onto their own layer. Add a bevel to the ribbon pieces on this new layer. Reduce Opacity to about 30%.

Make the ribbon layer active again. Use the Burn tool (nested with the Sponge and Dodge tools) to add some shadows along the beveled pieces, to more fully outline the word art beneath. Use a soft-edged round brush, set to Shadows, at about 50% opacity. Make sure to match the drop shadow settings that you have used in other places on the page – for example, the shadows on the word art are on the right, so I used the Burn tool on the right of the bevel. Staying on the ribbon layer, use the Dodge tool to add highlights on the other side of the bevel.

 06-19-14_DodgeAndBurn_AnnaM_SS3_DodgeAndBurn
Link all of the word art and ribbon layers together, just so you don’t accidently move anything, and you are done!

Now, look at the two ribbons side by side. Doesn’t the one where you can see the word art beneath look so much better, so much more realistic?

This is just one way to use the Burn and Dodge tools to add shadows and highlights. I can’t wait to see how you use them on your layouts, so be sure to upload them to the Scrap Girls gallery!

 Products used:
ScrapSimple Tools – Styles: Basic Shadows 6501
ScrapSimple Tools – Styles: Metals 5001
ScrapSimple Embellishment Templates: Stapled Ribbon


Tutorial written by Anna Mansfield
divider fancy

Welcome to the SG Design Shop Blog - where modern memory keeping meets heritage scrapbooking! Here you'll find digital products and all the inspiration you need to complete your projects.

subscribe-imgTo our Free Newsletter

Search the blog

Favorite Categories


Learn How Sidebar Badge
Tutorials Sidebar Badge
hybrid projects sidebar button
art journaling sidebar button
mobile scrapping sidebar button
planners sidebar button

Connect with us

SG Facebook Image

Partners

Qwiklearn -The easiest way to learn digital scrapbooking!

Adobe Photoshop Affiliate Badge

Links

  • About Us
  • Storefront
  • Terms of Use
  • FAQs

HELP

  • Contact Us
  • Email

FOLLOW US


© 2023 Scrap Girls - All Rights Reserved.Privacy PolicySite Map