
Article written using Adobe Photoshop Elements 7 with Windows 7
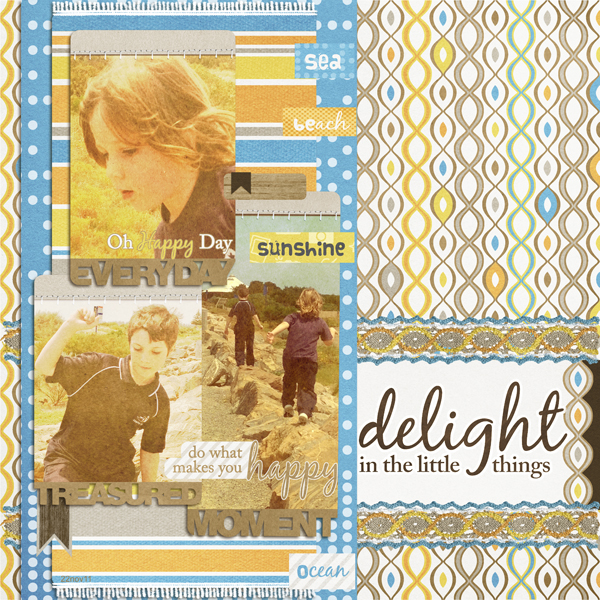
When I saw the Free Scrap assignment, I started thinking about ideas. I am often told I have a knack for putting together patterns well and for making a “busy” page look simple and uncluttered. So I decided that today we would create a digital scrapbook page together and you could see peek over my shoulder to see how I build my pages.
I decided to use these photos of my boys climbing on the rocks at a beach near us. I chose to use Jacqui Smith’sDigiDoer Everyday: August Kit for this page as the colors were gorgeous, and it was also beach-themed and boy-friendly.
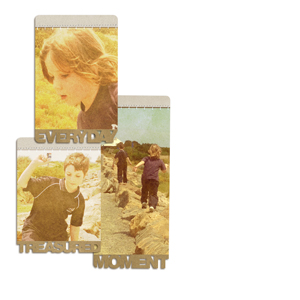
 So, where to next? I selected the Kraft Paper word art frames from Jacqui’s kit and cropped my photos to fit, clipping them to the frames. Next, I added Blending Modes to give my photos an aged, sun-kissed appeal (the frames were already colored). For the larger photo of both boys, I simply used the Overlay Blending Mode. For the smaller photos, I used Linear Dodge (add) then duplicated this layer and changed it to Overlay. So, for the smaller photos, my Layers Palette has a copy of my photo using Overlay Blending Mode clipped to a copy of my photo using Linear Dodge (add) Blending Mode, and these are clipped to the frame.
I am happy with my photos and the frames, so now we can add the papers. I selected both the multi-colored Waves and Blue Dots papers. I used Waves as my background, but it seemed to dilute my photos. To counteract this and add some visual interest, I cut a shape from the Dots paper using my Rectangular Marquee Tool. This rectangle shape acts as a mat behind my photos, but I wanted to coordinate the colors some more. I selected the towel from Jacqui’s kit and used it as a mat over the Dots paper, stretching it a little to fit. I liked the way the patterns worked, and the colors matched beautifully.
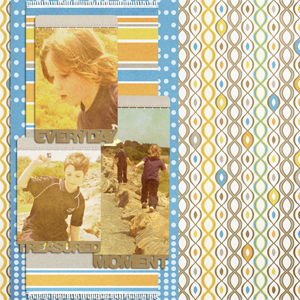
For balance and a place to put my title, I added a journaling card, flanked by the lace pieces. Then I placed the Word Art from Jacqui’s collection on the journal card, changing the color to brown by clipping a layer and using the Paint Bucket Tool with a shade I had selected from my background paper.
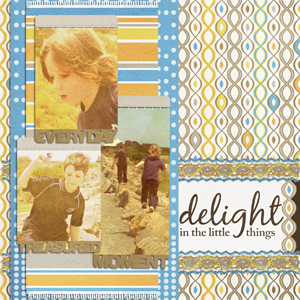
Finally, to round out the page I used some tags, a date, and more word art.
To summarize:
- I clipped my photos to the frames and adjusted using Blending Modes.
- I made my background and photo mats using two papers and the towel.
- I added some balance and visual interest by using the journal card and the lace and by adding a big title.
- Finally, I added some smaller details, in this case, tags, a date, and extra word art.
My finished page matches beautifully, is visually pleasing, and tells the story. That is the reason we scrapbook! I hope to see you try out some of these ideas – maybe using Blending Modes on your photos or making your own photo mats using the Rectangular Marquee Tool… it gives endless possibilities to your digital scrapbook pages!
Post your creations to the Scrap Girls Gallery –- I will be looking for them!
Digital scrapbooking products used:

Commercial license versions of digiDoer Everyday: August Collection are also available.

Article written by Jody West


