

Digital photography has really changed the way we take pictures and has brought with it some fantastic solutions for editing not-so-great shots. I’m so glad most of my pictures are in digital form already. (That’s what makes digital scrapbooking so much easier and quicker!) However, like many of you, I do have a few boxes of printed photographs. It’s reassuring to know that I can preserve those precious memories in digital format as well. It just takes a few extra steps to convert them to digital.
As I was leafing through memories of printed photos, I came across a loose-leaf album of my engagement pictures and realized that they were the only copies I had. If I ever lost them, they would be gone.
So I decided to set to work scanning photos into my computer. Let me share the simple steps I took to get these photographs into digital format.
First, I cleaned my scanner glass. This is very important in saving unnecessary time editing the quality of a photo scan. Dust and fingerprints are easier to remove from the glass than from the scanned photo.
Next, I checked the settings on my scanner. I scanned most of my photos at 300 dpi in 24-bit color and saved them as JPG files. I had a few black-and-white photos and learned that if I scanned as True Grey, the colors and contrast came out better than 24-bit or the black-and-white option. Scanning at 300 dpi is just fine for images 4×6-inch and 5×7-inch in size. I have learned that if you want to enlarge your digital file to a size much larger than the original photo, then you may want to scan your photo at 600 dpi. Also prints smaller than 4×6 or larger than 5×7 should be scanned at 600 dpi as well.
I scanned my images in groups of three or four which saved some time. I opened each group into my editing program, Photoshop Elements 9.
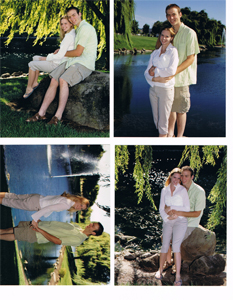
Here’s a neat trick I have discovered in this program: If you go to Image> Divide scanned photos, PSE cuts and opens individual files for each image. In order for it to work properly, you need to allow space between each photo on your scanner bed. If this doesn’t work for you, you can always use the Marque Tool or Crop Tool and select and transfer each one manually.
Once all my photos were separated, I went to File> Process Multiple Files. From there, I was able to choose settings and select a file to save all my recent individual scanned images for easy access later.
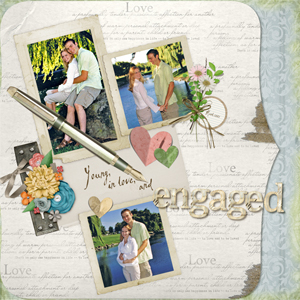
Now with all my engagement photos scanned and saved in digital format, I can easily select a few, perform some small edits, and create a beautiful memory for my digital scrapbooking albums.
I hope you won’t feel too daunted by the task of scanning your memories because it can give you some peace of mind when it’s done. I can’t wait to see all those treasured photographs in your beautiful digital scrapbooking layouts in the Scrap Girls Gallery!

Article written by Jennifer Wight


