
Tutorial created Adobe Photoshop CS4 and Windows Vista
Recently on the Scrap Girls Forum, there was a new topic from a member about how to use the Pocket Life digital scrapbooking products and the Pocket Page templates and how could they be adapted to an 8×10-inch layout format. At the time, there was a flurry of suggestions from a number of helpful Scrap Girl members and designers.
After thinking about that for a little bit, it occurred to me that this question would make a great article because a lot of readers may have wondered how to resize templates and digital products. With Photoshop, there are many different ways to accomplish a single goal, but today, I’m going to show you a super-easy way to adapt an 8.5×11-inch Pocket Life layout from a template into both an 8×10-inch layout and a 12×12-inch layout. Think of the benefits of this:
- You can diversify 8.5×11-inch supplies you already own.
- You can continue making layouts in your preferred size while taking advantage of great new digital scrapbooking products in alternate sizes.
- For those last-minute photo gifts, you can quickly take a layout and get it printed and framed in a standard size.
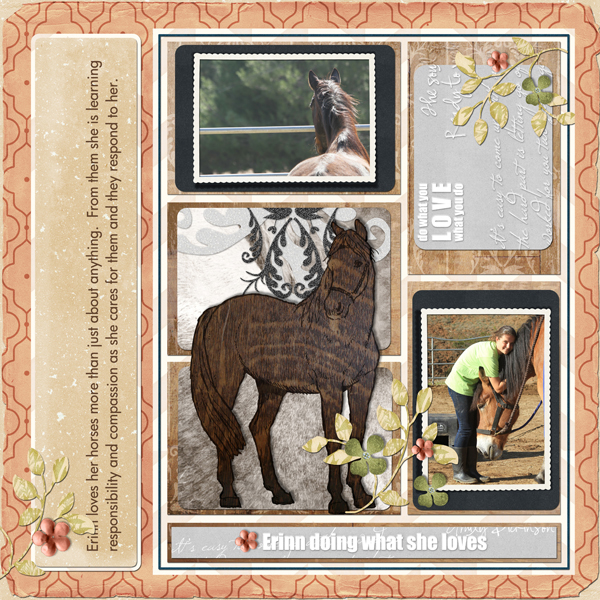
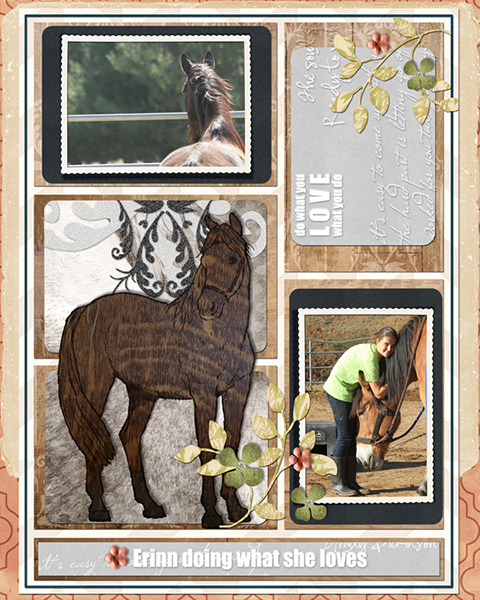
Let’s get started! The following Pocket Life layout was made with ScrapSimple Digital Layout Album Templates: 8.5×11 Digi Pocket Pages and Pocket Life: Style Board. Wild Horses Collection was also used to make a couple of the Pocket Life cards by clipping paper (Ctrl+Alt+G in Photoshop; Ctrl+G in Photoshop Elements) to the pieces of the template. Embellishments were added just for fun. The layout was completed in its entirety at 8.5×11-inch size and saved as a full resolution JPG. (Before you save your layout as a JPG, be sure to save it as a PSD file first so you can make changes later if necessary.)

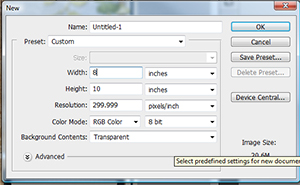
Let’s make this layout into an 8×10-inch format. First, create a new, blank document at 8×10 inches. Then, open your full resolution JPG version of the layout.
With both documents open and the Move key selected, hold Shift and drag your JPG document onto the blank 8×10-inch document. You will see that your layout is larger than your new document. With the Move key still selected, click on one of the bounding box corners, hold the Shift key and pull in on the corners until it fits within the new document. To get the 8.5×11-inch comfortably on the 8×10-inch, you will have a small border around your JPG layout.
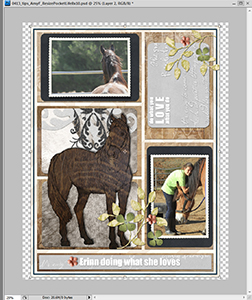
To use this blank space in a pleasing manner, simply place a coordinating paper (or two!) on a layer beneath your layout. In this screenshot below, you can see what my layers looked like.
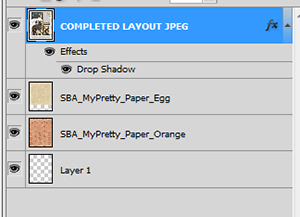
The end result appears as a frame or border around my layout.
The same concept can be used for making your 8.5×11-inch layout into a 12×12-inch in the same manner. Simply open a blank 12×12-inch document and drag a JPG of your finished layout onto it. Position it in a pleasing manner. For this step, you may choose to make your layout larger or smaller on the page to fit your vision. Within the white space on the page, add a journaling block, journaling, and a small embellishment cluster to help the eye move through the new layout. Here’s an example of how I enlarged my 8.5×11-inch layout to a 12×12-inch format:
By making a JPG copy of your Pocket Life layout and placing it onto a new document, you have multiple options as to the sizing of your end result. No matter what size you print, Pocket Life products and templates can be a versatile tool to make your digital scrapbooking a fun and efficient means of documenting your memories – your way!
Digital scrapbooking products used:


Commercial license versions of ScrapSimple Digital Layout Album Templates: 8.5×11 Digi Pocket Pages, Wild Horses Collection, My Pretty Collection Mini andScrapSimple Tools – Actions: Deep Shadows 6501 PSE and PS Biggie are also available.

Article written by Amy Flanagan


