
It was time to make a decision. What on earth was I going to do for a Christmas card this year? I finally decided to alter some wooden letters to give them a Christmas feel and have the girls and the pets (yes pets!) pose with a letter to spell out MERRY. This printable craft was so quick and easy; I decided to make more and share how I did it with all of you!
Supplies List:
Your favorite digital scrapbooking supplies
Wood or paper mache letters from the craft store (the ones I used were 6″ tall)
sand paper
pencil
scissors
glue
ink pad, applicator, freezer paper or mat (optional)

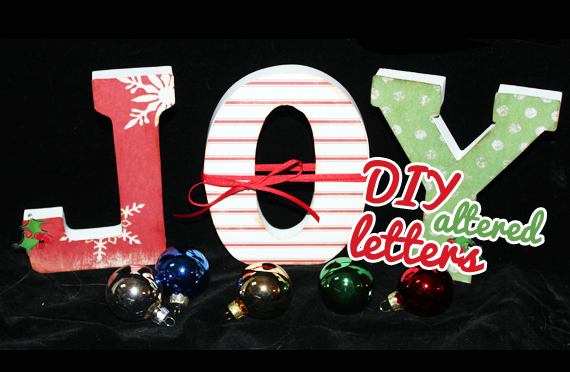
For this project, I decided to use the word “Joy”. I wanted to have a visual reminder to look at when the stress of the season started to take over! I chose 3 coordinating digital scrapbook papers to alter my wooden letters. I decided on wood over the paper mache because the surface was smoother and they wooden ones seemed sturdier. But you could definitely use paper mache if you’d like to.
Step 1- To begin, I printed out three digital scrapbooking papers with a holiday feel.
Step 2- Then, I laid my paper printed side down. Next, I placed the letter on top of the paper, right side down. I then traced the letter onto the paper. The pencil marks won’t show on the finished projects if you trace them this way. I traced the next two letters the same way.
Step 3- Cut them all out.
I love the look of inked edges and tend to do that on most of my hybrid projects lately! Instead of using a high priced crafting mat, I use a piece of white freezer paper. After applying the ink to the applicator, I just move the applicator in small circles near the edge of the letter for a soft look. This step is completely optional!
Once the digital scrapbook paper letters are ready, I turned to the wooden letters. Using sand paper, I “roughed up” the surface of the letter just a bit so the glue would have something to “grip” to.
Step 4- Next, I used glue to cover the front side of the letter with a thin layer of glue and placed the paper letter on top, carefully lining up the edges.
Once the glue has dried, you can decorate your letters with ribbons, stickers, flowers or anything else you can imagine!
Step 5- The sky is the limit when it comes to these altered letters! You can make them for any holiday. You can use fun digital scrapbooking papers to create wall art in children’s rooms. Or you could even use a larger letter as an initial and create a work of art for your living space! This project comes together so quickly, you will be amazed!
I would love to see what you create! Show off your projects in the Scrap Girls Hybrid Gallery.
But most of all, Have Fun!


 Tutorial Written by Carla Shute


