
I wanted to do a project for beginners – something that had step-by-step directions that could be followed to completion. My hope is you will be so excited about what you’ve done that you can’t wait to try out more hybrid projects using your digital scrapbooking supplies and techniques. This will be a two-part tutorial on how to create a baby book; and in this first part we’ll cover how to save a new preset page set-up, how to make and save a new swatch with your color choices, and how to use a digital element and fill it with a paper template and color. Let’s get started!
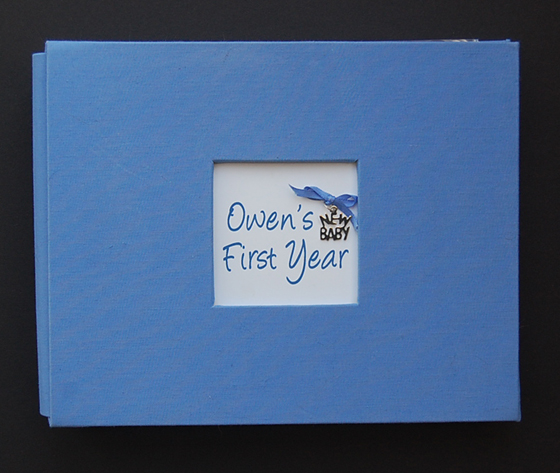
My niece had a baby boy a couple of days ago and I wanted to give her something simple to record a few events in. This is her third child and you know how it goes – the first child has an encyclopedia of every burp, smile and gurgle; by the time the third one comes along they’re lucky to get their name written down in a baby book. This small album will give them a place for monthly photos and a few words on what the baby is doing new.
Digita scrapbooking products used:
ScrapSimple Paper Templates: Fresh
ScrapSimple Card Templates: 5.5×4.25 Curvy
Supplies used:
Small Album – mine has 6×6 top-loading protectors
30 small brads in various colors to coordinate with your papers
1/16” Circle Punch for brad holes
Trimmer
Ribbon and Embellishment for the front window of the album (optional)
For this project I’ve chosen Mandy Steward’s ScrapSimple_12x12_Fresh Paper Templates. I chose these because I can set my book up with boy colors (which is what I need today) but if a girl comes along sometime in the future, I’ll have my album ready and can quickly and easily change my swatches to pinks and other girlie colors! We’ll get into how to do that further along in this tutorial.
Instructions:
I like to keep my projects together so I make a new folder on my desktop and name it FirstYearAlbum_Small_Boy. This is where I will file and save all my pages and other items I’ve used for this project.
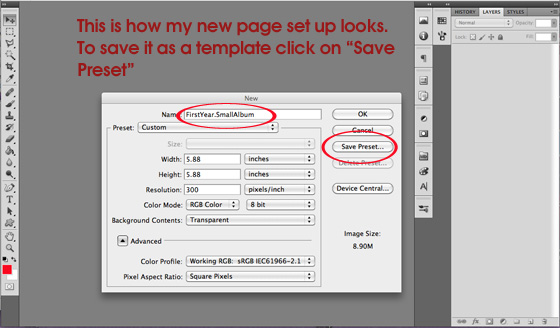
Let’s do some pre-work before we started designing. My album has 6×6 protectors so I made my digital pages slightly smaller so they would slide in easily. I also saved the Preset so when I go to the next pages I don’t have to type in all the specs again. Read further and you’ll see how to do this.
I opened up my Photoshop application
Under File I went to New and put in my dimensions (see screen shot below for specs)
Click Save Preset and change Preset Name to FirstYear.SmallAlbum. Click ok. Now you have a template saved so you won’t have to enter all the dimensions every time you want to open a new page.
Open your first page:
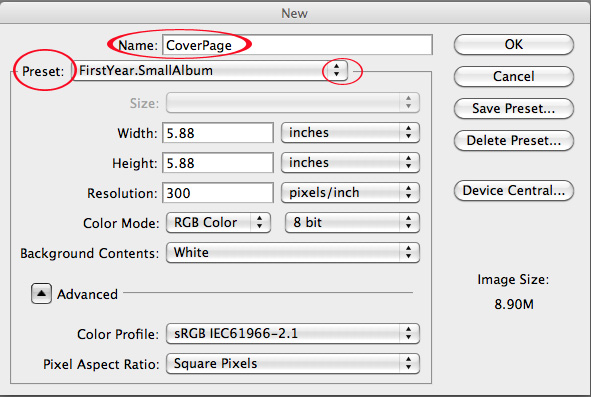
Go to File > New
Click on the up and down arrows on the “Preset” bar and go down to your saved template of “FirstYear.SmallAlbum”
Rename it “CoverPage” and click ok.
Swatches & Colors:
I’m going to choose my colors. I want a fresh swatch of colors for this specific book and I want three shades of each color: light, medium and dark. While there are probably several ways to go about it, this is how I do it:
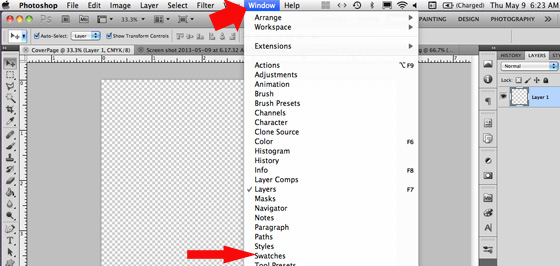
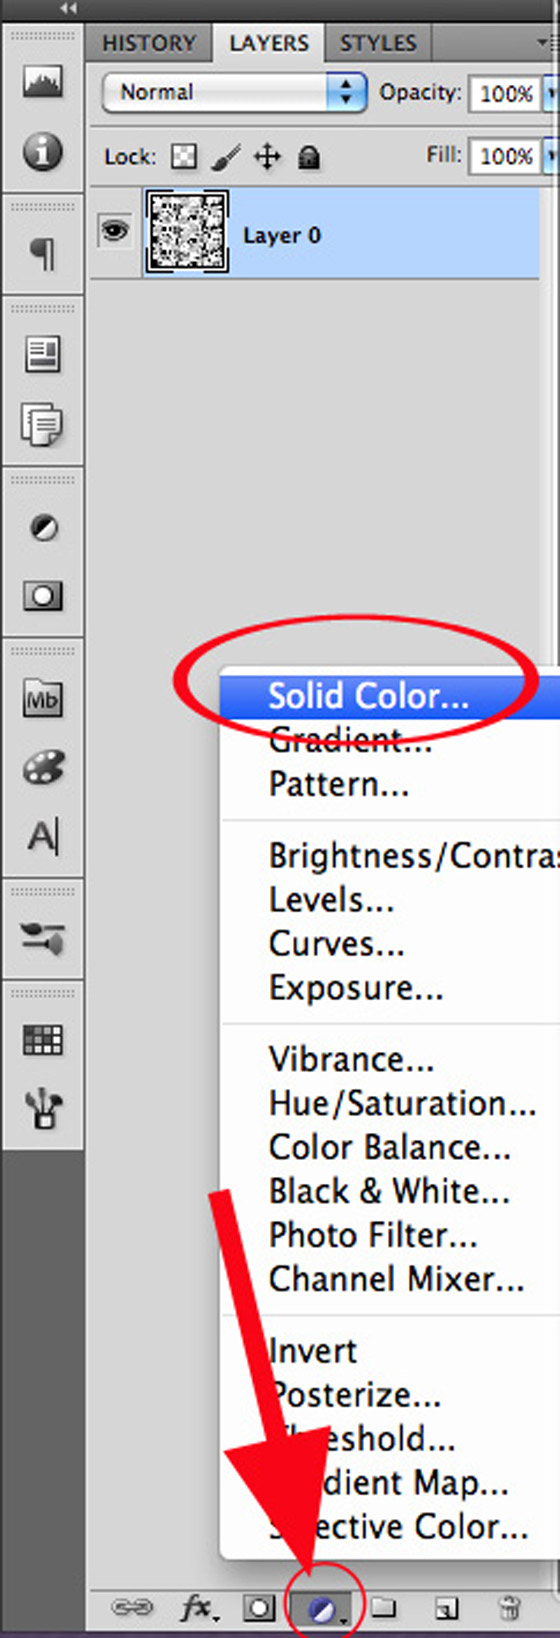
In PS, go to Window (in the bar at the top of your screen) and down to Swatches – your swatch panel will come up on your desktop.
2. At the top right of the swatch panel there is an arrow that points down; click on it and go down to
Preset Manager
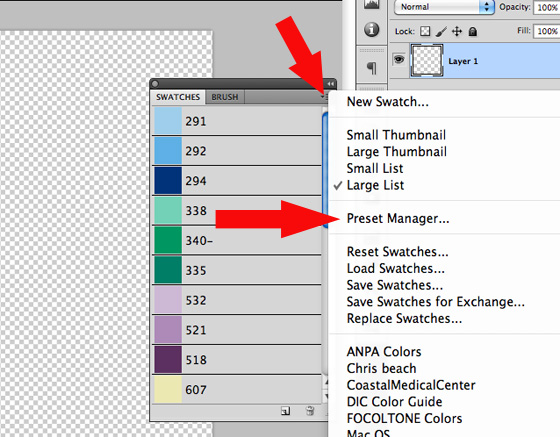
3. A box will open on your screen with your current colors in it. To delete certain colors click the first color you want to delete; hold down the Command Key (on a mac) and click other colors you want to delete. If you want to delete them all Click on the first color; hold down the shift key and click on the last color (they should all be highlighted with a black border around each little box of color) and Delete. Don’t worry…. you’re not going to lose anything – it will give you the option of saving your current colors if you haven’t already done so.
4. Click Done. Now your color swatch panel is empty (or has just the colors you did not delete) and you can add the colors you want to work with.
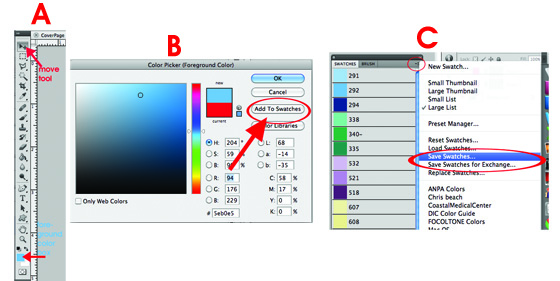
5. With the move tool, (arrow with plus sign) click on the foreground color box at the bottom of the tool pallet (to the left bottom of your screen). (See image A below) The click will bring up the Color Picker box.
6. Choose your first color by clicking on it and then Add to Swatches. (See image B below) You can name each swatch color if you want or it will default to Swatch 1, Swatch 2 etc. Continue picking and adding swatches until you have the colors you want to work with. Once your colors are complete, you can save them by going back to the downward arrow on your swatches panel and Save Swatches.(See image C below)
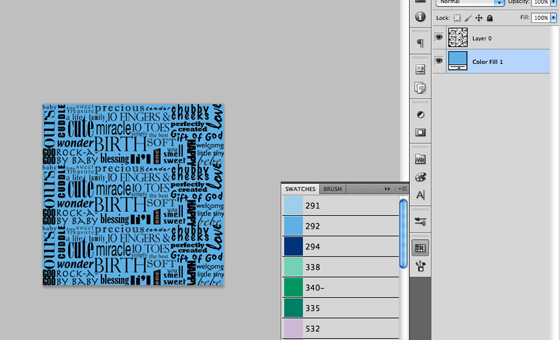
7. Name them. I named mine “FirstYearSmall_Boy” so I would know these are the colors I used in my First Year Album, the small Album and Boy colors.
8. Then I saved them into my FirstYearAlbum_Small_Boy Folder on my desktop so they will be easy to find when I work on this particular project again and I can reload them by going to the downward arrow, choosing replace swatches, go to my First Year Album Folder and choose those swatches.
Note: you can also choose your colors using PMS numbers – which gives you a wider range of colors and their variations. If there is enough interest in it I’ll do a short tutorial at a later date.
Cover Page
OK, we’ve got our colors and the first page is ready to be worked on. My cover page file is open in PS and I’m going to give the background layer a color.
Coloring the Background:
- At the top of your screen go to: Layer > New Fill Layer > Solid Color >OK. Open your swatches if they are not already open and choose a color and click OK. You will now have a new layer above the background layer that says Color Fill 1.

- If you don’t like that particular color you can change it by double clicking on the colored box in your layer called “color fill 1” box and you’ll be able to select a new color.
Filling Shapes
All my pages will have a shape that is filled and I’ll use the same techniques with minor variations. Don’t limit yourself! I used a unique shape from Mandy Steward’s ScrapSimple_CurvyCardTemp for my cover page; just because it was designed for a card doesn’t mean you can’t use it elsewhere!
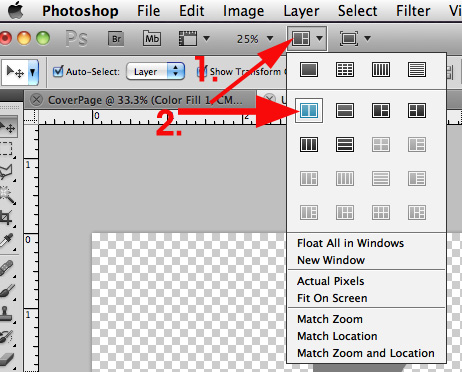
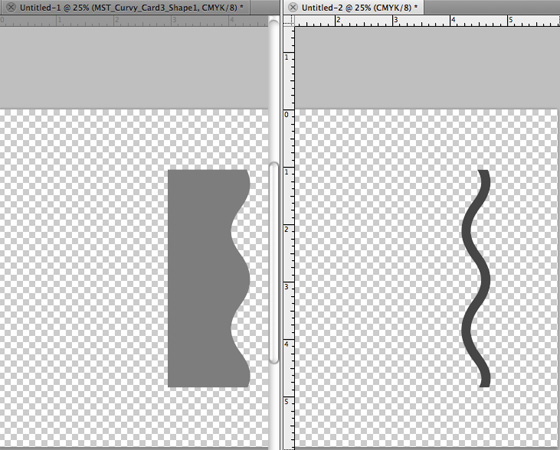
1. Open up MST_Curvy_Card3_Shape2 in a new PS window
2. Open up MST_Curvy_Card3_Shape1 in PS in another PS window
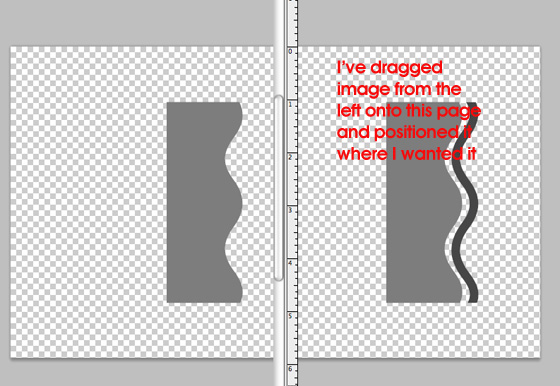
3. Make a split window so you can see both shapes (see photo below)
3. Click on your move tool (in your toolbar to the left – the one with an arrow and plus sign)
a. click and hold on the solid gray shape
b. while still holding down on your mouse, drag the solid gray shape over to the squiggly line window
c. Double click on it to release it
d. Line the two shapes up by using your move tool until you get them into the position you want.
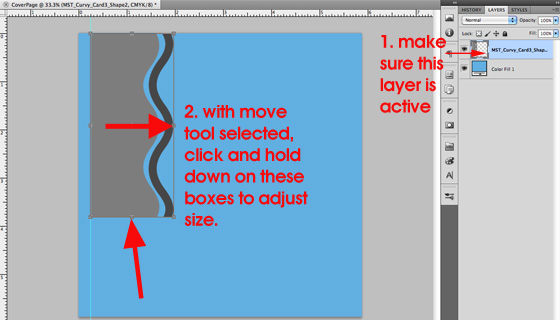
4. Merge the two layers and drag the shape over to your CoverPage and position it so it is at the top of your page and about ¼” of an inch in from the left side
5. Close out the Curvey_Card3_Shape1 and Shape 2 windows without saving changes to keep Brandy’s original files in tact.
Back to your CoverPage – click on the layer with your curvy shapes and and it will select your shape and show 8 little square boxes around it – one at each corner and one in the center of each side. Using your move tool click and hold on the small box at the bottom center of your shape and drag it down until your shape reaches the bottom of your page. Now grab the right side middle box and drag it to the left until it looks about the thickness you want it to be. Mine ended up being about 1-3/4” wide.
Adding a Paper Template and Color to the Shape:
To fill this shape I opened up Mandy’s Baby Talk paper template in a new window.
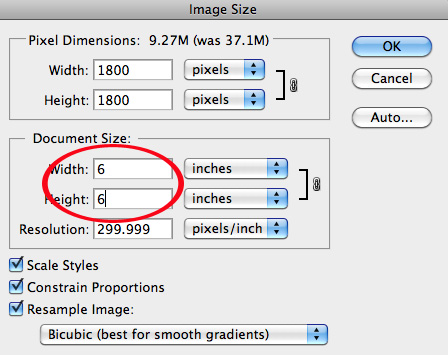
I want the words smaller to fit better on the small album page so I reduce the paper template by going up to
Image>ImageSize>Document Size and made it 6” x 6” and click ok.
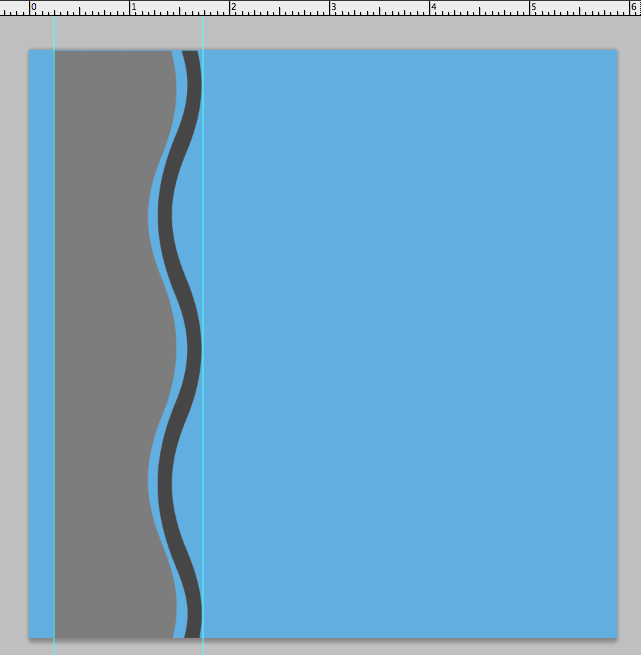
I’ll add color to the background by going to the bottom of the layers pallet and clicking on the circle that is ½ black and ½ white (see diagram below).
3. Scroll up to Solid Color and the Pick a Solid Color box will open on your desktop and dump your default color in. Don’t panic, you’re going to use your swatches for the right color
4. Open up the Swatches panel; click on the color you want; click ok in the Pick a Solid Color box.
5. Move this color layer under the paper template layer and your board should look like the snapshot below.
Next we’ll add color to the letters on the template.
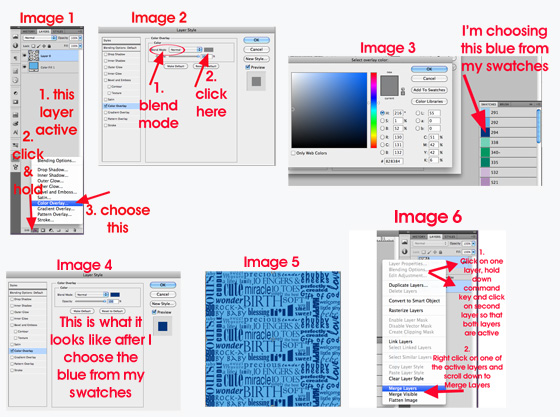
- With your template layer highlighted, click on the fx at the bottom of your layers panel and scroll up to Color Overlay (see image #1 below)
- The Layer Style Box will open; Blend Mode is going to be Normal and you’ll Click on the gray-filled box to the right of Normal. (see image #2 below)
- Select overlay color box will pop up and you can select your color from your swatches. (see image #3 & 4 below)
- Click ok, click ok again.
- Now your letters should be filled with your color choice. (see image 5 below
- Save this altered paper by going to File >Save As and give it a new name, (be sure to go to SAVE AS so you don’t compromise Mandy’s original file) Now you can you can use it again and change the colors easily. Just save it to your folder on your desktop.
- Merge the two layers (see image 6 below)
Now everything will be on a single layer that you can click-hold and drag over to your CoverPage and drop in.
Close your paper template window but don’t save the changes.
Almost there…
See the images below to clarify the new few steps:
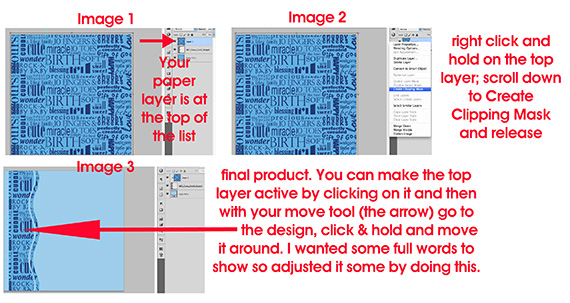
- You want to fill the curly shape with this paper and to do that you’re going to create a clipping mask. Your paper layer needs to be above your curly shape – if it’s not, then drag it to the top by clicking on the layer, holding down and just dragging it up to the top.
- Right-Click on the paper layer and scroll down to Create Clipping Mask and <Woo-hoo!> you now know how to fill a shape with a pattern/paper.
- You’ll use a lot of this in this album and be an expert at it in no time. (A nice trick: if you don’t like the positioning of the words in the shape you can click on the layer with words and it will highlight that layer on your page and you can use your arrows on the keyboard to move it around and position the words where you want them.
- Save your file.
Now you can add wording as desired; also any textures that you want. I extracted feet from one of Mandy’s papers to add on there and this is how I did it:
1. Open the paper template Feet in a new PS window
2. Grab the Rectangular Marquee Tool and click it around a set of feet and you’ll see marching ants
3. Change to the move tool, click-hold on a black portion of the feet inside the marching ants and drag them over to your CoverPage.
(Don’t forget to close the original Feet png page without saving any changes.)
4. Resize the feet, if you choose, and give them a color overlay just like you’ve done above. You can also add texture, beveling etc – play to your heart’s content!
If you noticed, in the snapshot below there are two light blue dots in the upper right corner. I’ve made these marks so I know where to punch the holes for brads. I’ll tell you how I did that in part two of this tutorial.

Your Cover Page is complete – ready to print out, trim down, and add brads if you so desire. Save it as a PSD File so you can make changes later if you want.
That’s it for the Part 1 of this tutorial. Next time we’ll learn how to make templates for the pages, how to draw shapes and fill them and use type on the pages.
Start Scrappin’ Hybrid-Style!

Tutorial written by Bobbi Start


