

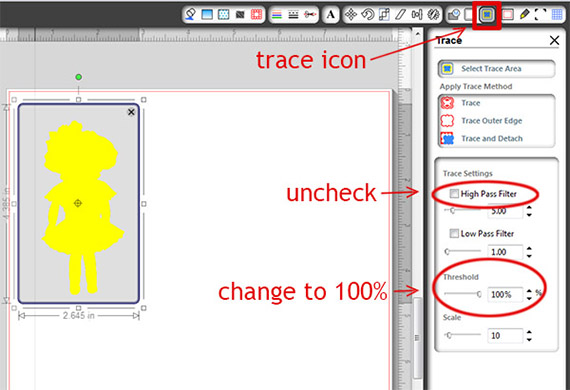
I was lucky to get a Silhouette Cameo as a gift last Christmas. One of my favorite features is the print-and-cut option. In this tutorial, I will show you how to print and cut digital scrapbooking supplies with the Silhouette so they can be used on paper scrapbooking layouts, cards, or anything else you can think of! First, open the Silhouette Studio software. Click on the Open icon in the top tool bar or choose File> Open. Navigate to your digital scrapbooking supplies and choose an embellishment to print and cut. (You will need to select PNG under File Type in order to see your files. You can print and cut other file types, but I chose PNG files because they have a transparent background and are the easiest to cut.) You can put several different embellishments on your page, but for this example, I am only showing one. Next, trace the image so the Silhouette will know where to cut. Click on the Trace icon and the Trace Panel will open to the right of your image.
- Choose Select Trace Area, then click and drag until the gray box covers the image you would like to trace.
- Under “Trace Settings,” uncheck the High Pass Filter and move the Threshold slider to 100%. The image should show up as a solid yellow silhouette.
- Choose Trace under the “Apply Trace Method” box.
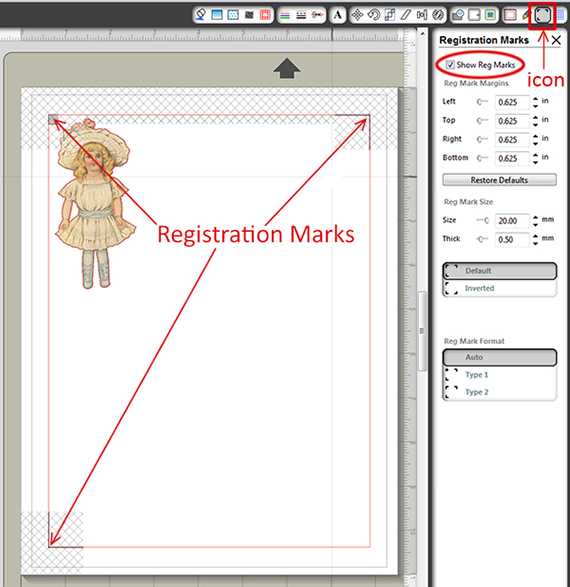
Your traced image will now have a red stroke around it. This stroke won’t print; it just shows the cutting lines. In order for the Silhouette to cut on the lines after your image is printed, you will need to add registration marks. Open the “Registration Marks Settings” window by clicking on the icon. Check Show Reg Marks, and a gray grid will appear on your page. Make sure your image is inside the outer red lines and is not covered by a registration mark.
There are two places you can choose to print in the Silhouette software. In the top menu bar, you can click on thePrint icon, which will send your image to your printer. Since you have registration marks, you can also click on the Send to Silhouette icon. This option will give you a prompt to print the image before cutting. Make sure you choose the best print settings for the paper you are working with. After your page is printed, follow the instructions in the Silhouette Studio software for loading your page into the Silhouette for cutting. When you get this prompt – “Detect registration marks before cutting?” – choose Detect Automatically. This will ensure your cut lines are aligned with the edges of your printed image. When I am cutting embellishments for a card or digital scrapbook page, I create a basic layout in Photoshop so I have an idea of which items I want to cut and their approximate sizes. I usually add a few extra items to fill the space. For the layout below, I used the Silhouette Cameo to print and cut all but the text and background layers. It cut the holes in the eyelet-edged paper perfectly. If you’re a paper scrapper who has made the transition to digital scrapbooking, you will love Silhouette’s capabilities of merging the tactile aspects of paper scrapbooking with the absolutely endless array of graphic elements offered in digital scrapbooking. Now you can multi-purpose your digital stash and bring it to three-dimensional life!

 Tutorial written by April Martell


