

Article written using Adobe Photoshop Elements 7 with Windows 7
When I first started scrapping and seeing digital scrapbooking templates in the Scrap Girls Boutique, I thought they looked really complicated and like something that just “wasn’t for me.” But then I tried them! I started out by clipping papers to the pieces and adding in my photos. This was wonderful because it was so easy. (At the time, I was learning Photoshop Elements, which was enough of a challenge in itself). The designers had done the hard work, and I just “iced their cake.”
However, it just wasn’t personal enough. I wanted to add more of me to it.
Then somewhere along the way, I read an article that completely opened my eyes to the possibilities of templates and gave me a freedom to work with what had previously constrained me.
It seems so obvious, but I will say it anyway. Nothing has to be there. Not one piece on the template is a must. Things can be taken away and duplicated at will, extra pieces can be added, the template can be rotated or flipped, and the pieces…? Well, the pieces are just pieces. Consider them as markers. They show you where to put items but they don’t dictate what to put there, what shape it must be, what size it must be, or even if anything should be there at all. They are just guides. That is the #1 thing I want to stress today – the template pieces are a guide only.
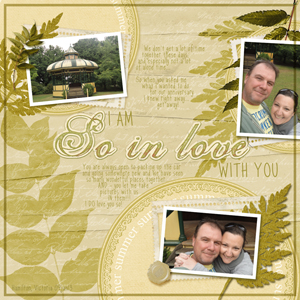
Let me show you what I mean. I’ve picked a template I really love from Cheri Thieleke’s ScrapSimple Digital Layout Album Templates: 12×12 Tilt a Whirl Mini. It’s ideal for this example because it has a variety of pieces to play with.
First, I chose my photos. Then I clipped and merged with the frames. Very simple. Next, I chose a paper that works well, a lovely plant-inspired page from Noteworthy Collection Biggie to go with my Botanic Gardens photos. This sets the tone for my page

I opted to stick with fern/tree branch embellishments and poked these under the photos. The Visual Triangle is set by Cheri, and I am just working around it, using her pieces as a guide. Note that I have placed my pieces slightly different from her locations and underneath my photos.
Next, I decided I really liked the extra frames behind my photos, but I didn’t want to just clip or recolor the pieces already there. I wanted to personalize the page a bit and since we were away from home, I opted for postage stamp frames. These had the bonus of sitting nice and flat and working within my color scheme.

The large round pieces had me hunting for doilies but I wasn’t sure how I would get the texture to work. Then I came across these circle mats from Cottage Rose Collection Biggie. These worked perfectly as they were also flat, and despite our clothing, it was the middle of summer, so the collection’s word art fit, too!

Finally, I added shadows, an anchor piece to the bottom photo for interest, a main title, and something that really makes the page mine – journaling. Spare photo spaces or subtitle spaces are often other good spots to add in your journaling. Then I made sure to turn off all the pieces I didn’t want to see by clicking the little eye icon in the Layers Palette.
So, now you can see how easy it was to change this digital scrapbook template into something that is personal and works well with my photos. I followed Cheri’s design fairly closely to demonstrate my point, but you could change it in so many ways – and I would love to see your template personalization in the Scrap Girls Gallery. Give it a try so we can all see your artistic side!
Digital scrapbooking products used:


Article written by Jody West


