
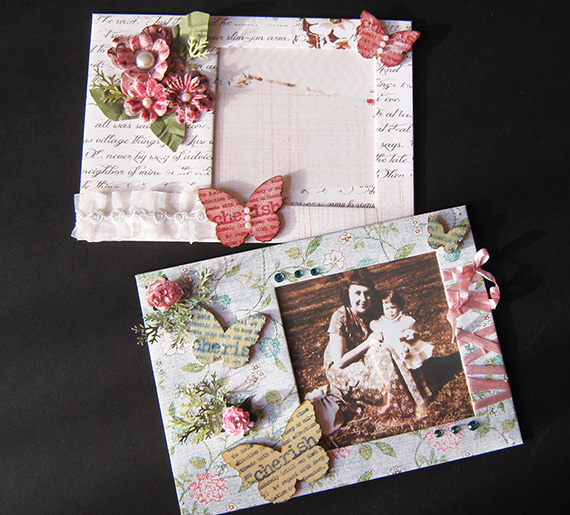
Join Hybrid Team Member Lei Maier as she shows you how to create 5×7 magnetic photo frames!
Digital scrapbooking supplies used:
Cottage Rose digital kit
Spring Whimsy digital kit
Craft supplies used:
Sturdy file folders, cereal box cardboard, or chipboard
2 sheets of paper (I used HP Presentation Paper, 32lb 2-sided matte finish)
Clear plastic (acetate sheets)
Good tacky glue, ATG or double sided tape
Magnetic strip or dots
Ruler
Pencil
Craft knife
Embellishments to coordinate with your SG paper choice
Instructions:
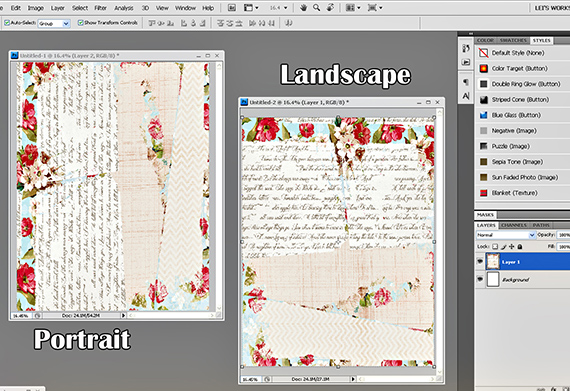
Start by opening your photo editing program ( I use Photoshop) and create a 8.5 x 11 inch document 300 dpi (this is your base). Select your choice of digital background paper and slide it into your program and onto your newly created document. Scale paper down and trim to fit on your sheet. Print 2 copies on quality printer paper.
*NOTE – If you are using obvious directional patterned background paper you will need to open an additional 8.5 x 11 inch base and slide your directional pattern paper onto the base then rotate 90°, so pattern paper is landscaped rather than portrait. Size and trim to fit. Print one page of this directional print landscaped and one page portrait. (See example using Brandy Murry’s Cottage Rose Paper_Mix 2).
Cuttings:
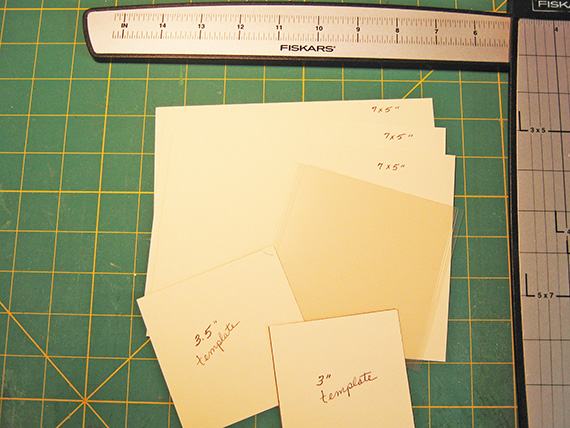
- File folders (cardboard) cut three pieces @ 5 inches by 7 inches
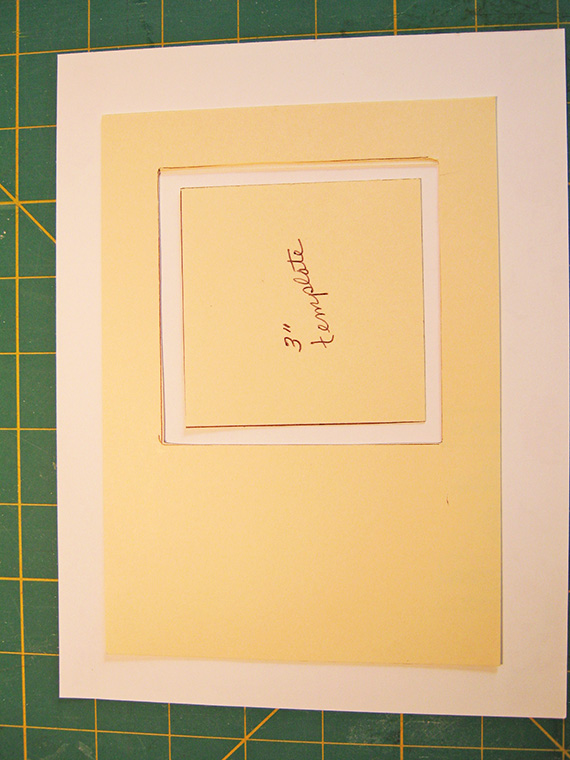
- With left over cardboard cut one 3.5 by 3.5 inch square and one 3 by 3 inch square to be used as cutting templates.
- Paper cut landscape print 6.5 inches by 8.5 inches; cut portrait print 7 inches by 10.5 inches (if your pattern direction doesn’t matter, you still need one sheet @ 6.5×8.5 inches, and one @ 7×10.5 inches)
- Clear plastic acetate sheet cut one @ 4 inches by 4 inches square
Frame Front
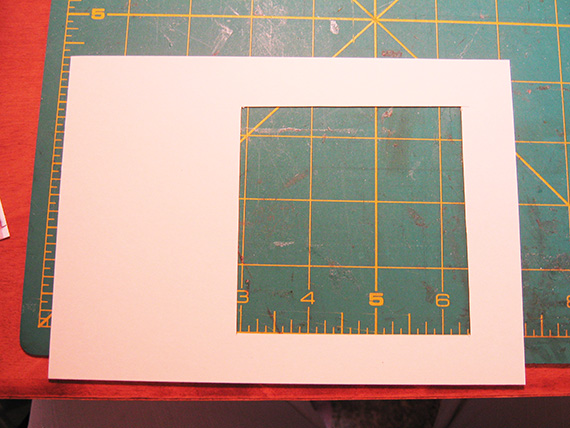
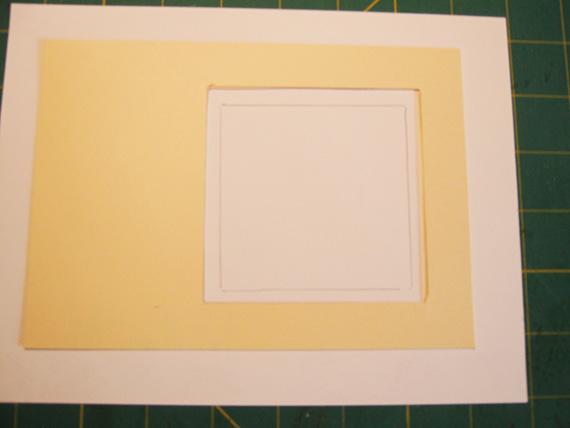
On your first 5 x 7 inch piece of cardboard measure and mark .75 inches from right hand side, top and bottom. Position your 3.5 inch square template on these lines and pencil around this opening and using the ruler and your craft knife, cut on the lines so you will now have a 3.5 inch “window” cut into your cardboard. Place this piece on top of the second piece of cardboard, trace and cut the “window” on this second piece so that you now have two identical pieces. Glue together making them one piece.
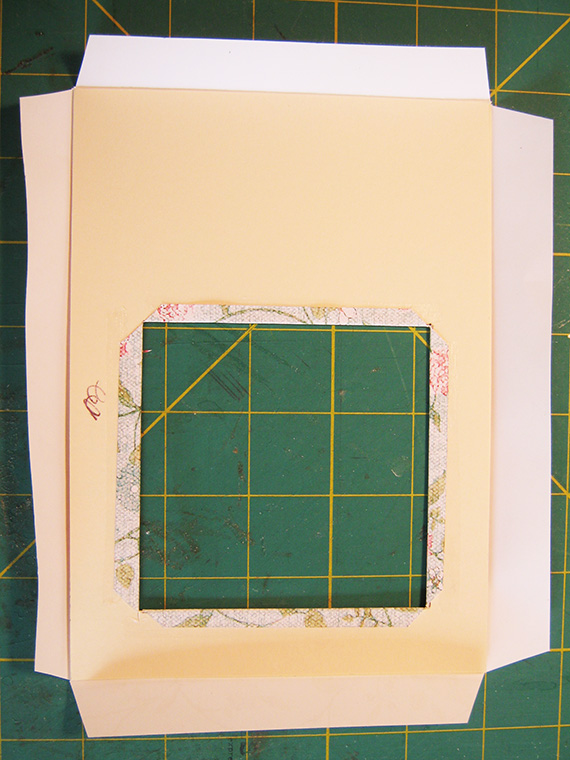
Next, place the 6.5 x 8.5 inch paper print side face down on your work surface. Center the “window” frame cardboard on top. Holding the cardboard in place, run the bone folder around the outer edges of the cardboard lightly scoring the paper, then gently lift the edges so the fold is a little more pronounced. Remove the cardboard “window” frame, apply glue or double sided tape, then reposition on the paper, using the fold lines as guides, nestling it into position and smooth out so paper and cardboard adheres together. Leaving your work face down, take the 3 by 3 inch square template and center it in the “window” opening and trace around it. Use a ruler and craft knife, cut out the 3 inch square in the paper center. Cut a 45° angle from each corner toward the center creating flaps that you will fold toward you and glue/tape to the backside of the frame. *NOTE If you want to do a ribbon wrap do this before the next step!
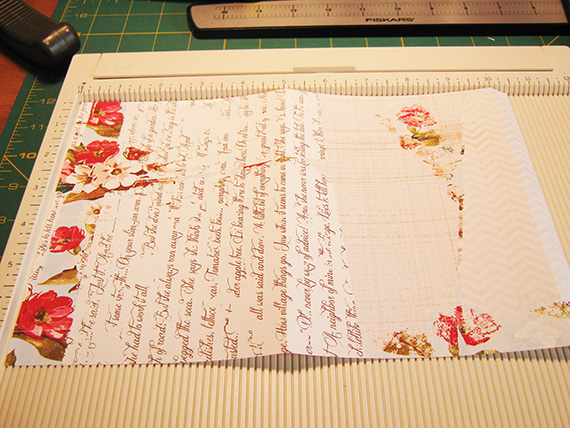
Center the 4 by 4 inch plastic over the “window” opening and glue/tape down. On the paper overhang around the outer edge of your cardboard, you will want to cut 45 ° angles from each corner outward, again forming flaps. Using the fold creases you made, wrap these flaps toward you and secure with either glue or double sided-tape. Put this piece aside.
Frame Base
Score the 7 by 10.5 inch patterned paper at 5 inches and 10 inches. Place face down on your work surface. Using glue/tape, place your 5 by 7 inch cardboard in the center 5 inch segment aligning the sides and score lines with the edges of the cardboard. Fold the 5 inch top flap toward you and glue/tape down. Now bring the .5 inch bottom flap toward you and crease and glue/tape to back forming a nice smooth “wrap” around the cardboard. Place magnet on this back side.
Turn piece over, then apply glue or double-sided stick tape to the side and bottom edges only, leaving the top side open. Center your frame on the frame base and adhere sides and bottom. Now you are ready to embellish the left side of the frame. Have fun with this! You can use your digital scrapbooking embellishments along with a Silhouette machine to decorate your frames along with your traditional scrapbooking supplies – the possibilities are endless! Once decorated all that is needed is to slide a photo in and present it as a gift or hang it on your refrigerator as a gift to yourself!
If you give this project a try, please be sure to post it to Scrap Girls Hybrid Layout Gallery so we can see your creation!
And as always . . . Enjoy the Process!!

Tutorial written by Lei Maier


