Don’t you just love those decorative blocks used in home decor? The blocks spell out special words for everyday or holidays, and they look so nice displayed on a shelf or mantle. Plus, they are fun to change with the seasons and even family events like birthdays.
I love the look, but to be honest, I’ve never bought any because I always tell myself that they would be so easy to make myself by painting them or using a collage technique. However, I’ve never gotten around to it because I never had the supplies on hand or made a special effort to find the wooden blocks. But recently a light bulb went on in my head. Why can’t I make the blocks out of paper using my digital scrapbooking supplies? No reason whatsoever!
St. Patrick’s Day is coming up, so I thought I’d start there. Here’s my inspiration:
The great thing about this project is that you probably have all your supplies on hand. If not, they’re just a download away!
Here are the supplies I used:
- Cardstock
- Scissors
- A tape runner
- A ruler
- A butter knife (used to score the fold lines)
- A digital photo cube template. I used ScrapSimple Craft Templates: Photo Cubes 2.5 inch and 3.5 inch.
- Look for themed digital supplies that reflect the holiday or your theme. I’m doing St. Patrick’s Day blocks, so I’ll be using items from my Shamrock Collection.
When you have your supplies, create your digital blocks:
- Open up the template in your editing software.
- Clip a digital background paper to each square. (I used the same paper for each square.)
- Sample a color from the paper and recolor the tabs to match.
- Duplicate one of the squares, and bring it to a layer above your paper layer. Reduce the size just a bit and center it over one of the squares below.
- Clip a contrasting background paper to the smaller square.
- Bring in alphabet letters to spell the word “LUCKY” and a few coordinating embellishments. Center them all over the contrasting square and size them to fit.
- Turn off the visibility of the elements except for the letter and embellishments that you want to print first. Arrange the visible elements to your liking.
- Print your first block.
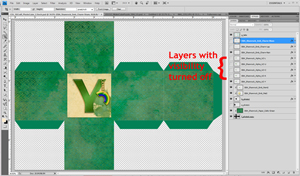
Toggle the visibility of the letters and elements for each block you want to print, and print the remaining blocks one at a time. Here’s what mine looked like before printing:
Once you’ve printed your blocks:
- Cut out each block. I used scissors, but you can get more precise cuts if you use a cutting blade with straight edge or ruler.
- If you like, score the fold lines. A bone folder is ideal for this, but I just used the blunt end of a kitchen butter knife. Hold the edge of your ruler along the fold lines and lightly score the lines. You’ll get a nice, straight fold.
- Crease all the folds toward the inside of the block.
- Run a line of tape on the tabs. You can also use a glue stick.
- Fold into a cube, adhering the tabs to the corresponding edges. Repeat for all of your blocks.
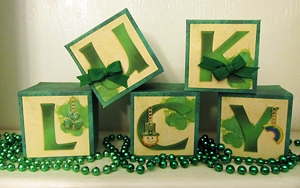
- You can decorate your blocks with additional embellishments such as ribbon and glitter. For mine, I tied little bows with ribbon and adhered them to the blocks without the digital charms.
And that’s it! Here’s my finished project:
I plan on making a set of these for every holiday we celebrate. Try making printable decorative blocks yourself. It’s easy, quick, and inexpensive. Happy crafting!


