• Facebook
  • Twitter
  • Google
ScrapGirls
  • SHOP
  • LEARN HOW
  • BLOG
  • FORUM
  • CHAT
  • CONTACT US
Select Page
Home / All Posts / Getting to Know the Layers Panel in PSE

Getting to Know the Layers Panel in PSE

The Layers Panel in Photoshop Elements - tutorial intro banner
Whether you are new to Photoshop Elements or have been using it for years, it’s always interesting to explore a bit and see the various menu options that are available. Today, let’s explore the Layers panel (or Layers palette). Keep in mind that in other versions of Photoshop Elements, the icons might be placed a little differently in the workspace.

Starting at the top of the Layers panel, here are the icons from left to right:

The layers panel menu.
Create a new layer – Lets you add a blank layer above the current one.

Create a new fill or adjustment layer – Several choices are available.

Add layer mask – Add a mask to the current layer. This allows for non-destructive changes, for example, erasing parts of the layer without actually erasing the original.

Lock all pixels – With a couple of exceptions (such as duplicating or merging), no change can be made to that layer unless you unlock it. This is good to use when you’ve gotten your layer perfect and don’t want to accidentally change it.

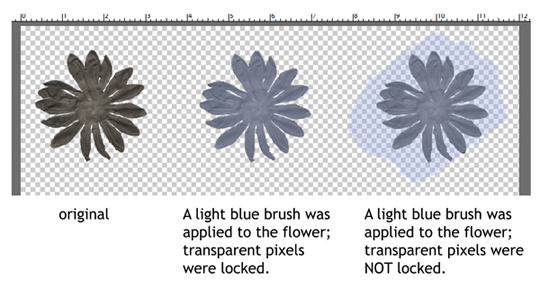
Lock transparent pixels – This allows for changes to a layer above a transparent layer without affecting the transparent layer. One example would be if you want to add brushwork to an embellishment.

Locking Transparent pixels in layers panel

Delete layer – This is a trash can, not a recycling bin. Once the layer is deleted, it’s gone, although you can go to Edit > Undo Delete Layer if you recognize your mistake soon enough.
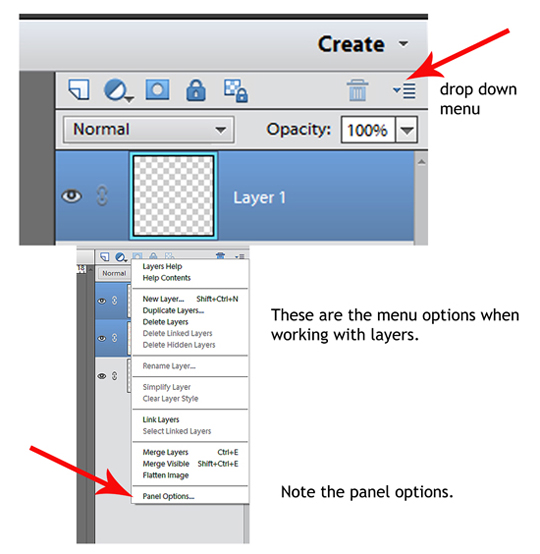
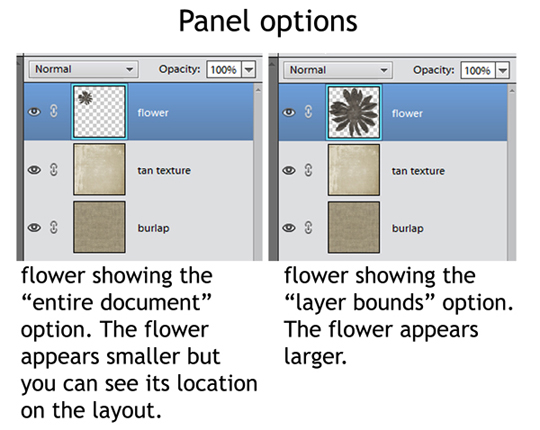
Drop down menu – This gives you layer options. Panel options give you display choices, too.

Drop down menu in layers 
 
Just under those icons, you’ll see blend modes and opacity. They affect only the active layer. To learn more, Scrap Girls offers several articles on the effect of Blending modes. Here are two: Using Blending Modes and What Are Blending Modes.

The Layers panel itself shows all the layers in your document. Each layer contains a visibility icon and also a chain link for linking two or more layers with each other so that they can be moved or resized together. When you click on a layer to activate it, it turns blue in the Layers panel.

Linking two layers in Photoshop Elements
Now let’s look at the bottom of the Layers panel. Tabs include Layers, Effects, Graphics, Favorites, and “More.”


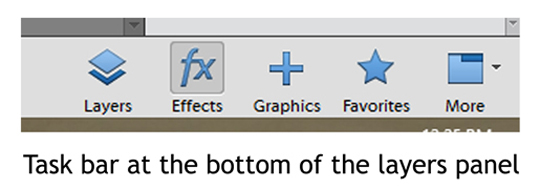
We’ve been describing the Layers tab, but the Effects tab brings you to even more tabs including Filters, Styles, and Effects. Under each of those menus are a wide array of choices. The one we probably use the most is the Styles tab. That’s where to find drop shadows and all the wonderful styles you’ve purchased from the Scrap Girls Boutique.

Filters and effects in the layers panel
Graphics – shows an array of backgrounds designed by Adobe.

Favorites – Adobe has included a few, but you can add your own. Just right-click or Ctrl+click on a style that you use a lot and choose “add to favorites.”

Last, there’s the More tab. As you can see, there are additional options under More. The interesting thing to note is that the drop-down menu changes for each one of those tabs. As an example, I’ve shown the drop-down menu for the Color Swatch tab.

Color swatches found under the more menu
Now that we’ve explored the Layers panel, I hope you’ll give one or two new menu options a try when you make your next layout. Show us what you’ve done by uploading your finished layout to the Scrap Girls Gallery, and let us know what menus you used!

Tutorial by Diane Lardieri

Welcome to the SG Design Shop Blog - where modern memory keeping meets heritage scrapbooking! Here you'll find digital products and all the inspiration you need to complete your projects.

subscribe-imgTo our Free Newsletter

Search the blog

Favorite Categories


Learn How Sidebar Badge
Tutorials Sidebar Badge
hybrid projects sidebar button
art journaling sidebar button
mobile scrapping sidebar button
planners sidebar button

Connect with us

SG Facebook Image

Partners

Qwiklearn -The easiest way to learn digital scrapbooking!

Adobe Photoshop Affiliate Badge

Links

  • About Us
  • Storefront
  • Terms of Use
  • FAQs

HELP

  • Contact Us
  • Email

FOLLOW US


© 2023 Scrap Girls - All Rights Reserved.Privacy PolicySite Map