For this tutorial, we’ll be working with ScrapSimple Embellishment Templates: Dangles.
I want to color the necklace I have circled here:

I began with a new blank 12×12-inch document at 300 pixels/inch. Then I filled the background with a solid color. It isn’t necessary to color the background, but I just prefer to work with a colored background.
I opened the template and dragged it onto my document, and duplicated it twice.
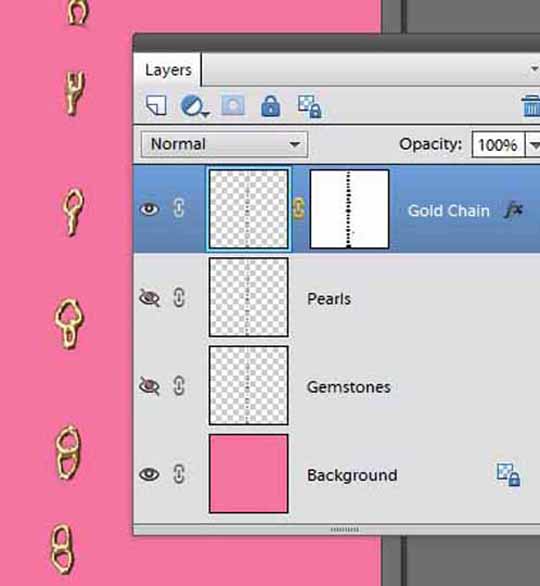
I renamed the layers as follows:
Layer 1 – Gemstones
Layer 1 copy – Pearls
Layer 1 copy 2 – Gold Chain
Chain
I pressed D to reset the color chips to the Default setting so black is the foreground color, and I applied a layer mask to the top layer (Gold Chain). Next, I turned off the visibility of the Pearls and Gemstones layers.
Note: At this point, the pearls and gemstones are still visible on the document, but in order to be able to use the layer mask, the visibility of those layers needs to be turned off.
I clicked on the layer mask thumbnail and selected a hard round brush. Then on my document, I zoomed in and scrolled up/down and brushed over the pearls and gemstones to hide them from view, leaving just the parts of the chain visible.
Tip: The pearls and gemstones can be hidden fairly quickly by using the bracket keys on your keyboard to resize the brush to the approximate size of each bead as you go along.
Next, I applied a gold style to the Chain layer. I used ScrapSimple Tools – Styles: Touch of Metal 12001. Other styles such as ScrapSimple Tools – Styles: Gold 8501 would also work well.
This is what my document looks like after hiding the pearls and gemstones and adding the gold style.
To color the pearls, first I turned off the visibility of the Chain layer and turned on the visibility of the pearls layer. I applied a layer mask as before and this time I brushed away the Gemstones and Chain, leaving only the pearls visible on my document.
Then I brought up the Hue and Saturation dialog (Ctrl+U) and moved the Lightness slider to the right to +60. This changed the pearls to a pretty shade of white that I liked.
This is what my document looks like with only the Pearls layer visible:


I opened a diamond gemstone from the same template set.
I turned on the visibility of the Gemstones layer, and making sure this was the active layer, I dragged the diamond onto the template and placed it over the bottom gemstone, sizing it so that it was slighter larger than the template stone. Then I held the Alt key, clicked and dragged a copy up onto the next gemstone. Again, holding the Alt key, I clicked and dragged a copy up onto the next gemstone on the template. I continued this process of copying each diamond and placing it above a gemstone on the template until all the gemstones were covered.
Note: After resizing the first (largest) diamond, there is no need to resize the others – some of them will be considerably larger than the template stones and shaped a little differently, but they will resize and conform to the template shapes when you apply a clipping mask in a few minutes.
Next, I selected Layer 1 (the bottom diamond layer), held down the Shift key and selected Layer 1 copy 8 (the top diamond layer) so all of these layers are selected. Then I pressed Ctrl+E to merge those layers. Then I pressed Ctrl+G to clip the merged layer to the Gemstones layer.

Tip: For the gemstones, instead of or in addition to a diamond from the template set, you could also use ScrapSimple Tools – Styles: Jeweled 6301 or ScrapSimple Tools – Styles: Jeweled 6302 and apply the style the same way I applied the gold style to the chain.
I hope you’ve enjoyed learning coloring templates using layer masks and found this tutorial to be helpful! There are so many pretty chains, jewels, pearls, and more in this template set, all perfect for adding some sparkle and bling to your pages. Have fun, and we would love to see some of your creations in the Scrap Girls Gallery.