

I love looking at what people have pinned about Art Journaling on Pinterest! Seeing what you like gives me a never ending supply of ideas for ‘Art Journaling – Scrap Girls Style’.
One of the techniques I keep seeing over and over again is painting on a book page, semi translucent enough to let some of the page show through. On this journey, you will be learning right along with me because I have never tried to duplicate an art technique ‘Scrap Girl Style’ before. I just gotta do what I gotta do!
Setting Up the Digital Part
For comparison sake, I’m going to use the same background paper and the same line drawings on all my ‘trials’. I will create a file that I can print out as needed. Hopefully, not too many times!
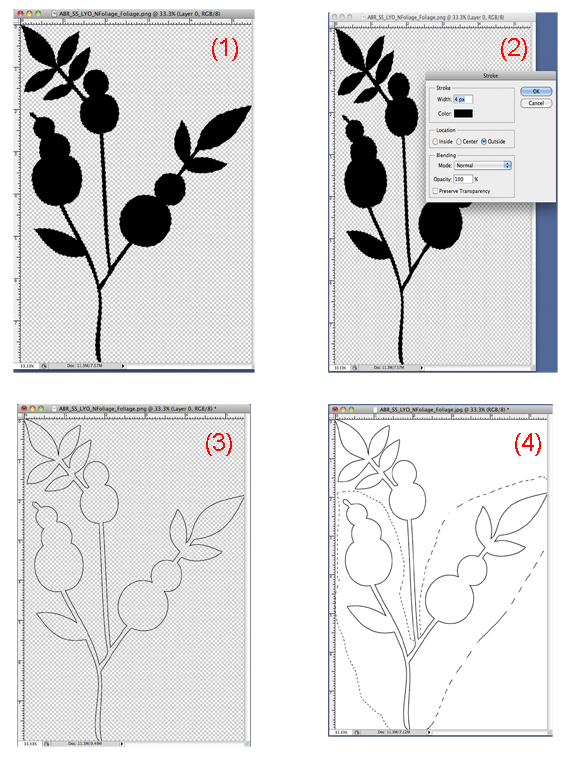
For my line drawings I am using two images from Angie Briggs’ ScrapSimple Layer Your Own Brushes: New Foliage. The 1st image (1) is totally black and here’s how to turn it into a line drawing:
Open the image and duplicate it, then turn off the original by clicking the eye. Using the magic wand tool, click anywhere on the inside of the image. Marching ants will appear around the edges. Click on File then Stroke. Set the color to black, the width to 4 and the location to outside, then click ok.
(2) It doesn’t look like anything has happened, but as soon as you click delete, then select/deselect, you will have an outline!
(3) I want only part of this image though. To get rid of the part I don’t want, I used the lasso tool and drew around the portion I didn’t want, double clicked to bring out the marching ants. (4) Then hit delete, select/deselect….This is the part I’ll use.
(5) The other image is already in outline form, so I didn’t have to do a thing.
(6) I opened a new file the size of my journal page. Brought both line drawings over, resized and rearranged until I was satisfied. Name and Save.
(7) I opened the chosen background paper from Angie Briggs’ Scenic Route digital kit. Duplicate and resized to my journal page measurements. Name and Save.
(8) I then opened a new document 8.5 x 11 inches, 300 dpi. Next, I brought the saved line drawing and my paper document over, placed to fit then named and saved it.

(9) THIS IS MY “TRIAL” FILE FOR PRINTING!
Trial #1
Print your trial file out on Magic Matt, (I like the 27 lb. weight best for this technique.) available at this link:
http://www.dotcalmvillage.net/artpapers.html
(This paper is the “KEY” to success! It renders the ink from everyday printers WATERPROOF….before, you could only do this technique using a laser jet printer!) Cut out the background paper and adhere it to the journal page with Golden Soft Gel Gloss medium. I used Derwent, Inktense water color pencils to color in the line drawings. Then I used a Niji, small tipped water brush to blend.
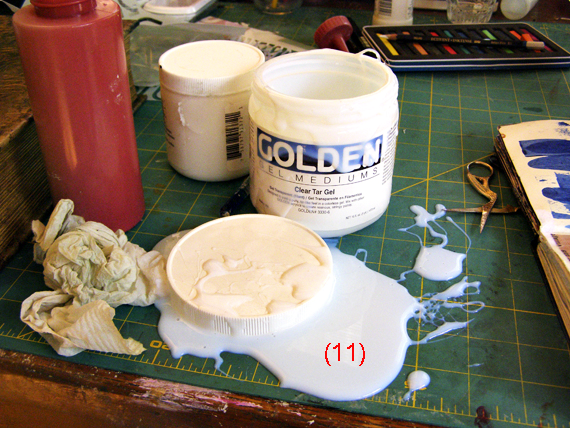
(10) In this trial, I diluted some white gesso and very lightly brushed around the outlines of the design. Let it dry thoroughly. Normally I use the Soft gel medium as the adhesive for the whole project…this time I wanted to try Golden’s, Tar Gel for the rest of the steps. Why? Tar Gel is self-leveling, meaning it will dry smoothly with no brush lines. (Word to the wise….when trying to open a stuck lid, do NOT bang it upside down on your table unless you are positive that it was screwed on properly!
 (11) After I cleaned-up, I brushed a pretty heavy coat (I used the mess on the table.) on the base paper that I had previously adhered into my journal & then a thin coat on the surface of the painting. (YES, the front of the painting!) I placed the painting upside down (the tar gel side) on top of the base paper. I used a brayer to roll out the trapped air bubbles. That was when I discovered I used way too much tar gel!…..It just kept oozing out the edges & I kept cleaning it off. If I use Tar Gel again, I will use less on the base paper & let dry before adhering the painting. Let the whole thing dry thoroughly!
Now comes what I call “the acid test”. I got a small bowl of water & dipped my fingers in it, then started gently rubbing away the paper.
(12) This looks promising, but the end result…
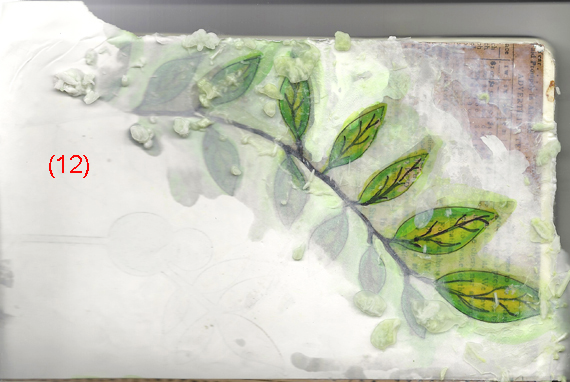
(13) was not quite a failure. The Tar Gel softened & became gelatinous and the gesso started to bubble up. Parts of the painting started to come off, so I actually scraped more of it off. But on some parts, I can see a glimmer of what I was shooting for!

On to Trial #2, which will be much shorter. The “how to” will be the same as here.I will explain any changes in mediums & techniques as needed.
Trial #2
I printed the ‘trial file’ again. Cut out the paper and adhered it to my journal page using soft gel gloss. Painted the line drawing with with the same water color pencils. This time I diluted a white acrylic paint and brushed lightly around the design edges. Then put a coat of soft gel gloss on the base and let dry. After it dried, I brushed another coat of SGG (abbreviation for soft gel gloss that I’ll be using from now on!) on the base paper and immediately put the line drawing face down on it. I used a brayer to roll out the air bubbles. Guess what? NO ooze! Let dry. Then started the “acid test”. Shortly into the acid test, I realized that this trial was a total failure:
Here are my conclusions: I should have put 2 to 3 more coats of SGG on the base and put 2 coats of SGG on the design before adhering it to the base. Not even a glimmer here!
Trial #3:
(Hopefully the Charm)
Printed the trial file again. SGG’d base paper to journal. Painted line drawing. 3 Coats of SGG to base & 2 coats to front of painting. This time I cut apart the painting and got rid of some paper excess. Added 1 more SGG coat to painting pieces to stick them on base. Let dry …… Preferably overnight, which I didn’t do.
Rubbed the paper off……I CONSIDER THIS TRIAL THE CHARM!
I am quite happy with the way it turned out! I’m thinking that the paper shadow is more noticeable because of the dark background.
I’ll do something with this to make it a WOW!

Turning a Glimmer into a WOW!
All I did to Trial #2 was dip my finger into some regular acrylic white paint and rubbed around the edges; sometimes wiping with a damp cloth. I REALLY REALLY LOVE THIS!
See you next time!
Jerrie
Digital scrapbooking products used:


 Tutorial written by Jerrie Hall


