

Brushes are one of the most versatile tools in photo editing software. They can be used to stamp, emboss, erase, even to die-cut. I’d like to show how you can accomplish blending with brushes in your digital scrapbooking layouts.
The best brushes for blending are those without hard edges. One example is the #100 Rough Round Bristle found under the Default Brushes menu. Although any soft-edged brush can be used for blending, the SG Design Shop offers wonderful brush options that are designed for natural-looking blending, and they make blending easy.
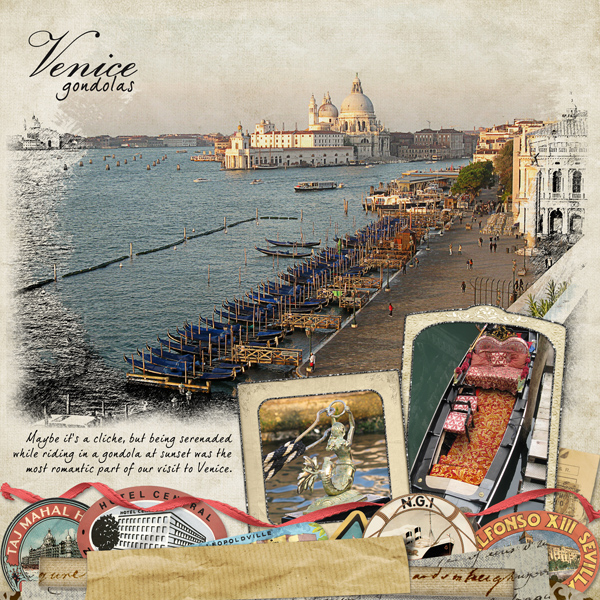
For a recent digital scrapbook layout about Venice gondolas, I chose the Brush Set: Painted by Syndee Nuckles.
To blend a photo into a background paper, my preferred Blending method is to use a brush on a layer mask because it offers flexibility while leaving the original photo untouched.

Make your brush fairly large, about 600-700 pixels, and 100% opacity. Hit D to set the color chips to the default black and white. Click on the photo layer, then on the mask icon (it looks like a square with a circle inside). Activate the layer mask by clicking on it and begin brushing around the edges of your photo. If you make a mistake, hit X to reverse the color chips, making white the default color, and brush away your mistakes. By hitting X, you can go back and forth between brushing and fixing until you have the photo looking the way you like with some of the underneath layer visible around the edges.
If you have an older version of Photoshop Elements without layer masks, you can also blend a photo directly onto the background paper by using the Eraser tool as a brush. Be sure to make a copy of the photo you are working on; never use your original! I’ve found keeping the brush fairly large, around 700 pixels, and touching (stamping) just a small part of the edge of the brush to the edge of the photo gives me the best results.

For my digital scrapbook layout of Venice gondolas, I used both methods. Also, just for fun, I decided to make a blended transition between my color photo and the background paper, so I made the edges of my photo look like an illustration.
Here’s how to achieve this fun blending effect:
Duplicate the photo (keyboard shortcut Ctrl+J), highlight, and link them by clicking on the little chain-link in the Layers panel. Turn off the visibility of the top photo by clicking on the visibility icon (it looks like an eye). Make the bottom photo black and white using your favorite method, for example, by going to Enhance > Convert to Black and White. You’ll need a nice contrast, so if your photo looks too gray, adjust its brightness and contrast by going to Enhance > Adjust Lighting > Brightness/Contrast. Next, go to Filter > Sketch > Graphic Pen. If needed, adjust the sliders until your black-and-white photo looks like a sketch.
Click on the visibility icon next to the color photo to make it visible. Add a layer mask to your color photo and begin brushing until some of the black-and-white photo sketch is visible around the edges. When you are happy with your results, merge the two photos (Ctrl+E).
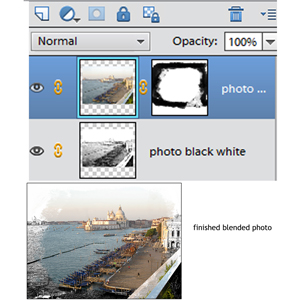
The merged photo can now be placed onto background paper and blended into it using either another layer mask or by erasing the edges.
I hope you’ll give blending with brushes a try on your own digital scrapbook layouts. When you do, be sure to upload your layout to the Scrap Girls Gallery and let us admire your creation!
![]()
Digital Scrapbooking Supplies Used:

![]()
 Tutorial written by Diane Lardieri


