
This is our Art Journal girl, Jerrie Hall’s first Art Journaling Scrap Girls Style tutorial! Stay tuned for more to come, where she will be showing us creative ways to use our digital scrapbooking products in fabulous art journals!
Hello there! I will be introducing you to the world of Art Journaling – Scrap Girls Style! You will learn how to combine digital scrapbooking products from the Scrap Girls Boutique and art materials; onto a page (single) or a spread (2 pages next to each other) in a purchased art journal. REMEMBER! The sky ISN’T the limit of the things you can Art Journal about!
The supplies you can use for your art journaling are limitless so I am going to share with you my favorite products:
My favorite brand of Art Journal is the “Moleskine”, Purple band. It’s size is compact (5 1/8″ x 8 1/4″), it costs around $19 US. The paper is VERY water media friendly. The paper color is a cream. There are many types of art journals out there, you are more than welcome to use any of them; just make sure that the paper is water media friendly!
On to my favorite pens/markers is Pitt Pens by Faber Castelle. They come in an array of over 50 colors; but to tell the truth, I only use the Mix & Match Essential Pitt Artist Pens in black. This pack has extra fine, fine, medium and brush tipped pens. The best feature of Pitt pens is that they don’t bleed through the Moleskine paper! This pack costs around $10.95 US.
Experiment with other supplies…..but Don’t forget to put EVERYTHING, including disasters in your Art Journal! That way you won’t make the same mistake again!
Along our Art Journal Journey, I will always try to remember to notate what Scrap Girls elements and art supplies I’ve used. Yell and scream if I forget something!
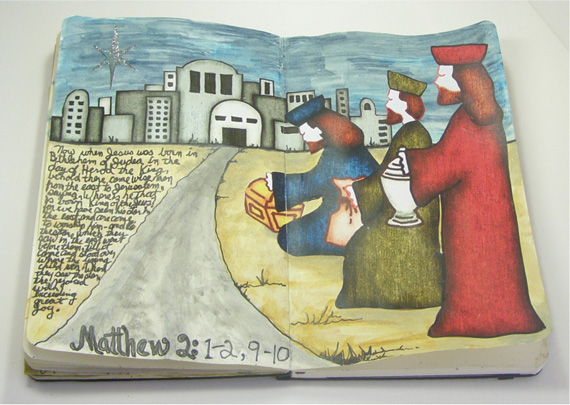
I LOVE stars, I LOVE Christmas, what better subject to Art Journal than the “Star of Bethlehem”? I found Brandy Hackman’s digital scrapbooking Assemble Your Own: Christmas Advent in the Boutique and the rest is History!
Let’s get started!
Step 1– Create a new file. (I use CS4) Set the dimensions a little less than your page/spread size. In my case I set the measurements to 10″ x 8″.
Step 2– Turn on the grid and the rulers. (If you have smart rulers, turn them on they are wonderful!) From the rulers, pull out a horizontal and a vertical guide line, and center them on the page.
Step 3- Select the Scrap Girls elements that you want to use on your spread.
Step 4- Create a new layer and drag and drop one digital scrapbook element onto your work area. Name the layer, then you can re-size and re-color if you like. Duplicate this procedure with every element you are going to use.
Step 5- Start moving the elements around until you are satisfied with the layout. Remember to plan for a Journaling area within your design.

To simplify cutting my elements, I have also decided to merge all the layers that pertain to the 3 Kings. (You don’t have to if you want to play around more with the arrangement in your actual journal, it will just entail more cutting.) Instead of 8 elements to cut out, I will only have 3!
Step 6- Create a new file with the standard 8.5 x 11 inch format. Drag and drop each element on to your new document. Name it PRINT. Then print and cut out! Notice, I did tweak the color!

Now we are ready to begin working in our journal!
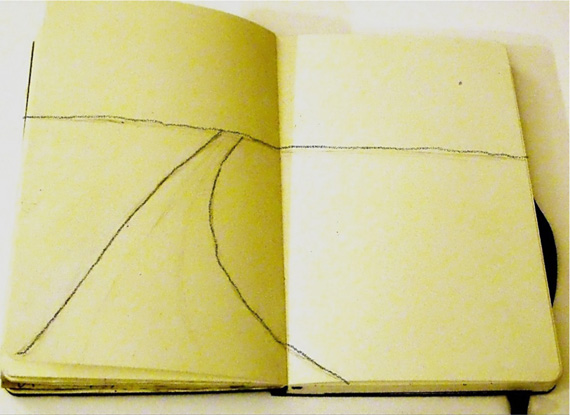
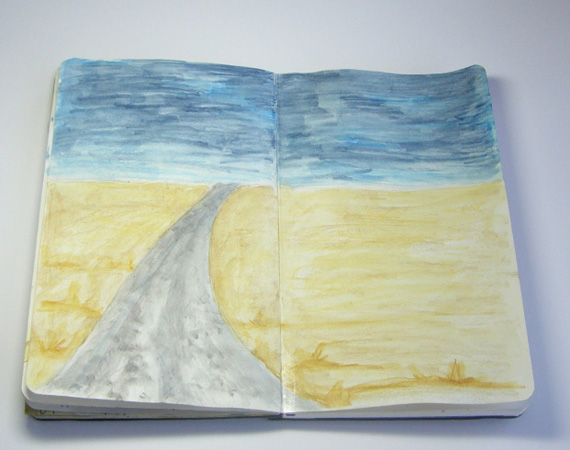
Step 7- Place your cut out elements on the journal spread. Take your pencil ( you want your lines to be VERY light!) and sketch onto the spread. I drew a horizontal line across the spread where the horizon line is, and a road from the entrance into the city to the bottom of the spread. For viewing, I made the drawing line dark.
Now it’s time to get out your art supplies and let the fun begin!
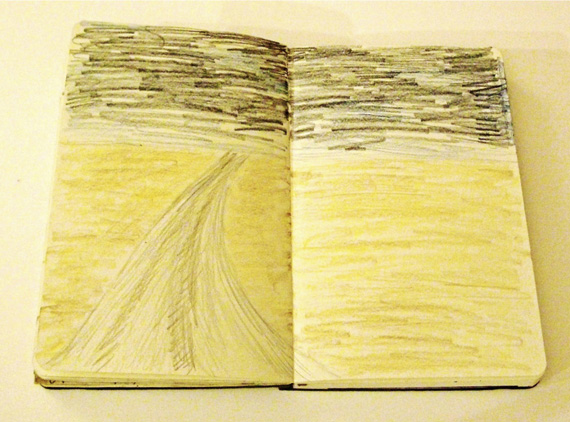
I’m going to use watercolor pencils – Derwent Inktense, CARAN d’ACHE and Design are the brand names I like the best. I’m choosing different blues for the sky and earth colors for the ground. Please choose the colors YOU like! You also can use a different medium: colored pencils, pastels, Copic markers and acrylics are some of the other mediums that work well.
Step 8- Scribble, scribble and scribble some more!
Step 9- I like to use a water brush. It is a brush that has water in it’s plastic handle, blend, don’t flood.
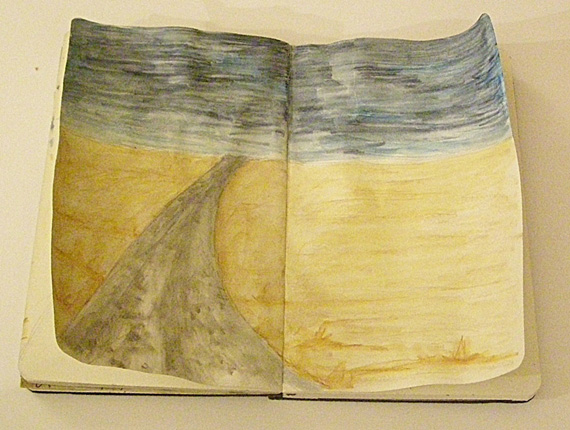
Step 10- Let your paper dry thoroughly; I cheated and used a heat gun so my pages warped a little more than usual. Not to worry! I’ve been known to get out my mini travel iron and iron them! (If you’re going for a museum quality spread, these hints are definitely a NO NO!) You can always add more color and detail to your spread by repeating the process.
Step 11- OK, now it’s time to add our cut out Scrap girls elements to the surface of our freshly ironed spread! (oooo! What a difference using Ott lights make when you photograph something! This is truly what my spread looks like!)
I like to use UHUstic glue stick purple, it dries clear and is acid free. Start gluing the element(s) that are the farthest away. In my case, it is the city. Next comes my 3 Kings, then lastly the star. I am going to “bling” up the star, so I’m not gluing it on now.(Hint….find an outdated telephone book, place the element to be glued upside down on a page….glue. Lift and place in journal.)
Step 12- When I reached this point, I stood back and really studied my spread. There were a few important things I wanted to take care of; defining the road, adding a little freehand detail ( I use black Pitt Pens) and MOST important of all, the Journaling and where to put it. If I put my Journaling on the road, it would visually flatten the whole spread. But if I put it on the left side, the journaling adds impact to the total design. The final thing to do is the star; I wanted it to sparkle, so before I glued it on, I glittered it!
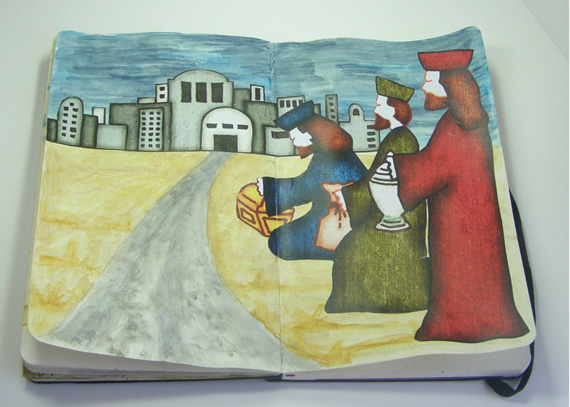
TA-DA…one pretty impressive Art Journal spread!’
And this is what my workspace looked like after I was done!

Homework for next Art Journaling lesson:
Start looking around your Scrap Girls stash for some beads!
Tutorial written by Jerrie Hall


