

This is a great printable envelope album suitable for giving as a gift to any friend or relative. It can be made to fit any occasion – birthdays, anniversaries, thank you gifts, teacher’s gifts, holiday gifts, and it also makes a nice little stocking stuffer. It can also be made for any age group. It’s just perfect for small gift items such as photos, gift cards, money, notes, etc. I love this particular mini album because it’s so much fun and easy to make. Remember, one of the greatest benefits of digital scrapbooking is that you can re-use products over and over as well as re-size and re-color products to suit your needs.
Finished size:
Closed – approximately 4 inches square
Opened – approximately 4 inches wide by 15 3/4 inches long excluding top envelope flap
Supplies Needed:
ScrapSimple Craft Templates: Envelope Album
Digital scrapbooking papers and embellishments as desired
Printer paper
Scissors/paper trimmer (if available)
Ruler and bone folder, stylus, or other suitable tool for scoring fold lines
Cutting mat or board to protect surface when scoring fold lines
Glue or other adhesive suitable for use on paper
Optional – cardstock or chipboard to stabilize and add dimension to inserts and/or embellishments
Envelopes:
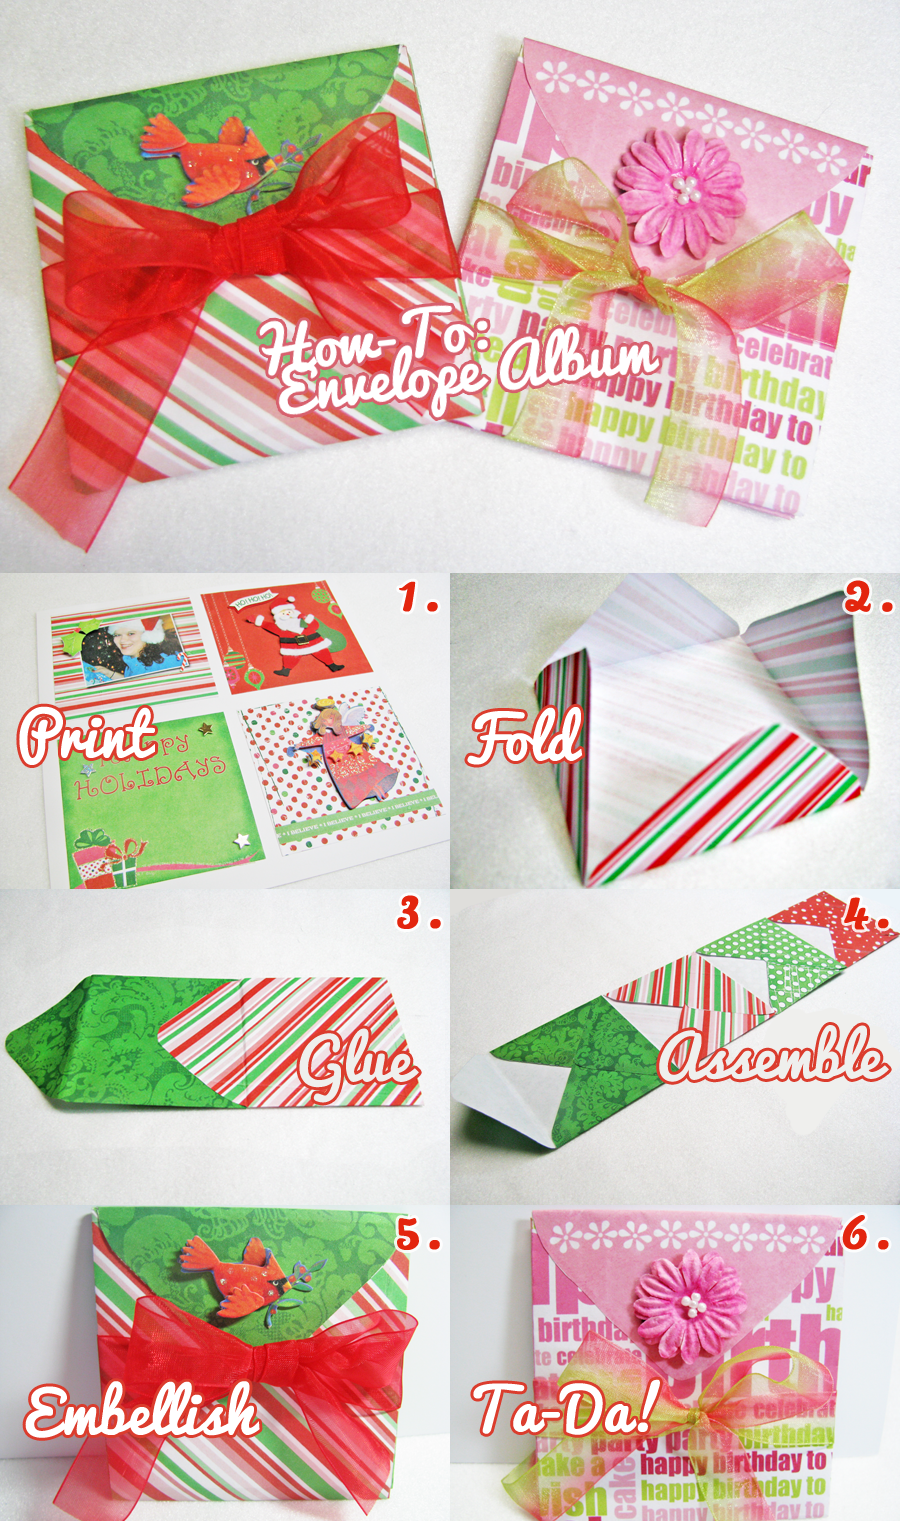
Step 1
Using digital papers and embellishments of your choice and the templates, create 4 envelopes and inserts according to the instructions included with the templates. Print the pages onto paper and cut out the envelopes, paying close attention to the rounded corners and “V” notches along the envelope sides.
Cut out the inserts and set aside.
Step 2
Score along the envelope lines as indicated in the product instructions and fold flaps inward. (Photo 2)
Fold side flaps in, and apply a small bit of glue where they overlap. Be careful not to apply glue beyond the overlapped area – you don’t want the side flaps to stick to the base.
Add adhesive to sides of bottom flap, fold up and adhere to side flaps forming the envelope pocket
Repeat for the remaining envelopes.
Album Assembly:
Step 3
With envelope backs facing up, adhere the flap of envelope #2 to the bottom edge of envelope #1. (Photo 3)
Repeat by adhering the flap of Envelope #3 to the bottom edge of envelope #2, and finish by adhering the flap of envelope #4 to the bottom edge of envelope #3. Your album is now assembled. (Photo 6 and 7)
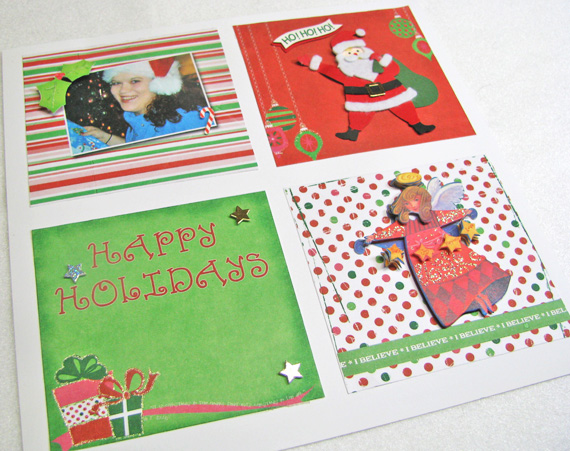
Inserts:
To give the inserts some stability and dimension, I like to glue each insert to a piece of white or coordinating colored cardstock or chipboard and trim the excess.
If you wish, you could also do the same with printed and cut out digital embellishments and glue them to the inserts/envelopes
Slip the finished inserts into the envelopes.
Finishing:
Optional: Add additional decorative elements such as bows, buttons, charms, dimensional stickers, glitter, lace, ribbon, etc. as desired.
Starting at the bottom, fold each envelope up and over the next one, bringing the top flap down over the stack. Attach ribbon to the bottom envelope in the stack, bring the ends around to the front, and tie.
If you decide to make some of these adorable little albums please be sure to post your creations in the Scrap Girls Hybrid Layout Gallery so we can all ooooh and aaaah over them! Have fun and I hope you enjoy making them as much as I do!
Scrap Girls digital scrapbooking supplies used:
Candy Coated Christmas Collection
Candy Cane Kisses Collection Mini
ScrapSimple Craft Templates: Envelope Album
Give it a Whirl Font
ScrapSimple Paper Templates: Eat Cake
Dynamic Brush Set: The Basics 6301 Biggie

Tutorial written by Theresa Guyer


