

Article written using Adobe Photoshop CS5 on a Mac
Shadows fall into two major categories and they each serve a different purpose in digital scrapbooking. Photoshop’s drop shadow layer style may be great for adding basic shadows to help elements stand out and give a design depth, but when it comes to creating more realistic shadows of people or objects, a cast shadow is more appropriate.
To determine which to use, consider whether the foreground object is parallel to or perpendicular to its background:
- When the foreground and background are parallel, use a drop shadow.
- When the subject is standing on the background, use a cast shadow.
The Scrap Girls product designers have created several drop shadow products to simplify adding basic shadows to images, making them look as if they are floating slightly above their backgrounds. In this tutorial, you will learn an easy way to create a cast shadow effect when you want to give a realistic, three-dimensional appearance to a flat piece of paper.
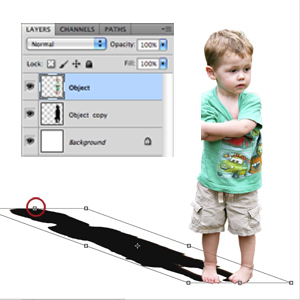
First, open your image and remove it from the background. Duplicate the layer by dragging it to the new layer icon in the Layers Panel.
Next, set the foreground color to black. Fill the new layer by pressing Ctrl+Shift+Delete (or Cmd+Shift+Delete on Mac).
Press Ctrl+T (or Cmd+T on Mac) to display the Transform Tool, then right-click on the selected object. Select “Distort” from the pop-up menu. You will see a bounding box with eight little squares. Click and drag the top middle handle to transform the shadow as shown in the example below. Press Enter (if you use Windows; hit Return on Mac) to accept the transformation.
Next, press Ctrl (or Cmd on a Mac) and click directly on the top layer’s preview thumbnail in the Layers Panel to load a selection around the shadow. Press the letter D on your keyboard to reset Photoshop’s Foreground and Background colors to their defaults. With the Gradient Tool active, click the drop-down list located next to the Gradient Tool icon in the Options Bar and select the first box. (If the Gradient Tool is not visible, place the mouse cursor over the Paint Bucket Tool in the Tool Bar at the left side of the screen and hold down the left mouse button until you see the Gradient Tool.)
Select the Linear Gradient icon in the Options Bar. Click near the bottom of the shadow and drag diagonally to the top. Press Ctrl+D (or Cmd+D on Mac) to deselect.

Go to Filter> Blur> Gaussian Blur and select a radius around 5 pixels. Click OK. A shadow not only gets lighter the further away it is, it also becomes softer. To make it slightly softer, use the Rectangular Marquee Tool, setting Feather around 10 pixels. Draw a rectangle around the end of the shadow. Go to Filter> Blur> Gaussian Blur and select a radius around 10 pixels. Click OK. Press Ctrl+D (or Cmd+D on Mac) to deselect.

Shadows are an important and sometimes overlooked part of design. The layout below displays both drop shadows and cast shadows. If I applied a drop shadow to “NATE,” it would have looked fine. However, when I added little Nate himself, climbing the letters, the alphas became perpendicular to the page. Then I used Syndee’s Scrap Simple Tools – Styles: Butterfly Shadows 6301 Mini on the remainder of the layout for an impressive overall effect.
I challenge you to study shadows that surround you and then apply what you see to your scrapbooking layouts. By all means, share what you have learned by putting your layouts in the Scrap Girls Gallery!
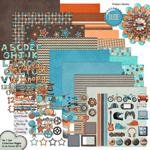
Commercial license versions of No.1 Son Collection Biggie, Pure White Paper andScrapSimple Tools – Styles: Butterfly Shadows 6301 Mini are also available.


